
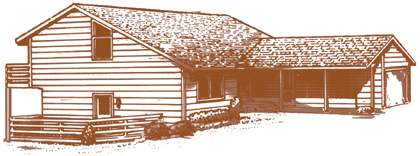
Home > Homes- Outdoor Rot
Outdoor Rot in Homes
Quick click to:
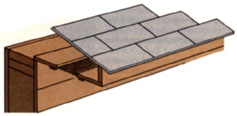
General Protection
If our Clear Penetrating Epoxy Sealer™ were inexpensive enough and the techniques simple enough, every piece of wood that goes into a house could benefit by being saturated with the CPES™. That is, in fact, what is done on some new wood boats: all new wood and all exposed wood is painted or injected with CPES™. It partially waterproofs the wood, sets up a barrier that discourages the influx of rot fungi (if they’re not already in the wood), and discourages insect penetration, which sometimes leads to rot problems. But a boat is small, the wood all top grade - and we’re buying wholesale!
CPES™ makes an excellent wood primer for any type of paint. On good wood it spreads a long way, and normal primers can be eliminated, so the expense is not outrageous.
There are areas in and around the house that are especially subject to rotting, and these can be treated with CPES™, or a combination of CPES™ and a disodium octaborate tetrahydrate solution application. We recommend that the powder dissolved in water method be used, since it interferes less with CPES™ penetration than does the disodium in glycol. First, apply the disodium solution, let the wood dry, and then the CPES™ to seal it in. This combination will give you an almost bulletproof barrier against wood decomposition, especially if particular attention is paid to end-grain sections.
Certain areas are obvious: windowsills, wood gutters and surrounding wood, post and column bases, wood framing, and we’ll get to some of those in the repair section. There are others that you often don’t think about that if saturated with the CPES™ could save you time and money down the road. Plywood is used frequently in home repairs and additions. Click here to see the results of our testing on plywood panels.
Siding and Siding Frame Joints
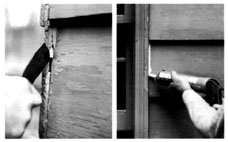
If these areas are brushed heavily with CPES™ before puttying or caulking the wood will be doubly protected. The CPES™ will absorb readily into the end-grain and penetrate further than you might think into siding boards and frames. Give it a couple of days to cure and then come back with final sealing. The CPES™ makes a superior base for all sealants.

All building corners can be likewise saturated with the CPES™. This is where the water usually gets in and the bad wood problems start. Seal the wood before you paint and then don’t think about it again.
Siding or siding frames that are weathered, splintered, or are soft and punky can be restored by generous application of CPES™ to the surface. CPES™ will be absorbed by the wood readily and when fully cured (2–5 days) will harden the surface and provide and excellent prime coating for paint. Paint should be removed before the application of the CPES™, and the wood should be reasonably dry. After the CPES™ has been applied, any holes or cracks can be filled with Fill-It™ Epoxy Filler.
Coverage for CPES™ on new wood will be approximately 250 sq. ft. per gallon. On old, weathered or soft wood the coverage will depend entirely on the absorbency of the wood, and usually varies between 100 and 175 sq. ft. per gallon.
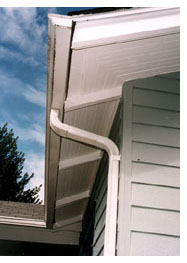
Gutters
For those of you who still have wooden gutters, it is possible to rot-protect them. Clean them out inside, make sure they’re reasonably dry, remove any loose rotten wood, and then soak at least twice with the Clear Penetrating Epoxy Sealer™. Make sure it seeps into all cracks and joints. Keep applying it until it pools and the wood will accept no more. Let it cure and then paint with a polyurethane-based finish. The polyurethane will bond with the CPES™ for very tight adhesion, and the paint will protect the epoxy from the UV degradation that all epoxies are subject to.
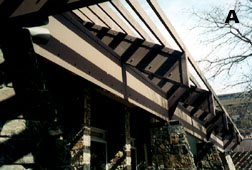
(A) Outside
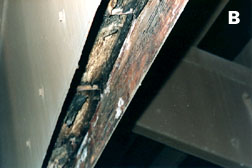
(B) Deterioration on underside of glu-lam.
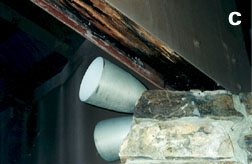
(C) Indoors showing glu-lam deterioration.
(D) The beginning of deterioration on the rafter beam.
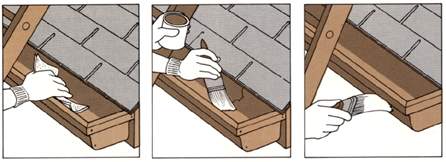
Eaves and Roof Overhangs
Associated with gutters are roof overhangs and eaves. These are not so easily repaired with epoxy wood consolidants, mainly because you’re working against gravity for CPES™ application. For light rot the CPES™ can be applied from underneath; it will “wick-up” into the rotted area for several inches in dry wood. Otherwise, you’re faced with removing roof edging and repairing it from above. If you have to go this far, then you are near the point of just replacing the eaves. Roof beams, however, can be repaired very effectively from above, since replacing the whole beam would be a major project. For bad rot, go through our entire CPES™/Resin/Filler sequence. If necessary, you can also sister the roof beam.
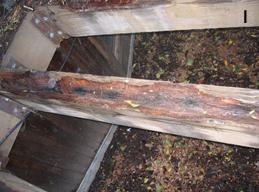
Here’s a cautionary note on what can happen if things are not done in the proper sequence. (Refer to photos) This home has massive glu-lam beams that go into the house and up to the roof peak, and with rafter beams that cross to support the roof. Years ago the glu-lam beams began to show some signs of rot and wood deterioration. At the time the thought was that by “protecting” the beams with 1/4″ steel plating it would end the rot problem. The bottom of the wood beams were left exposed.
The steel sheathing only aggravated the rot problem by creating a closed environment that made it more difficult for the wood to vent away moisture. The rotting process accelerated. The steel sheathing was not a bad idea, but before the steel “sistering” was applied the wood should have been thoroughly dried out and then saturated with CPES™. It would have required some access hole drilling near the tops of the beams, as well as coverage by brush or spray from the outside.
Large amounts of CPES™ was purchased and it was injected through access holes drilled down from removed bolts, and is was applied generously to all rafters through surface application and drilled access holes.
Beam and Joist Rot
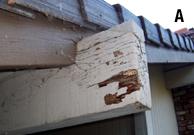
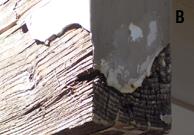
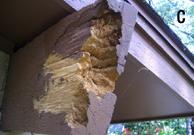
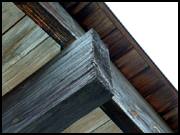
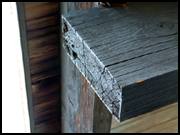
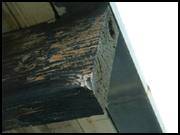
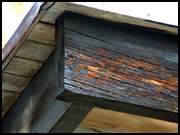
Beams and joists, particularly those that are exposed to weather, are apt to trap moisture, which often leads to deterioration and rot. This is a common occurrence on the exposed ends of the beams, as you can see in pictures A, B and C.
Click on photos to see larger images.
Repair of this type of damage is relatively simple:
1) Remove any loose wood and allow the beam to become reasonably dry.
2) Saturate the beam end with our CPES™. Allow the end grain of the wood to absorb all the CPES that it will. CPES will harden any remaining soft wood and significantly reduce the chances of fungi or bacteria returning to infect the wood.
3) Wait for several days (or longer).
4) Fill the vacant area with our Fill-It™ Epoxy Filler, or with new CPES treated wood bonded in place with the Fill-It Epoxy Filler. The Fill-It will chemically bond with the CPES treated surface. The beam can be repainted once the Fill-It Epoxy Filler has cured. For those wanting a toned final finish, the Fill-It Epoxy Filler can be colored to about any shade of brown using our Epoxy Coloring Agent.
This kind of damage to beam ends can be significantly reduced by pre-treating the ends of the beams with the CPES. Allow the end grain of the beam to absorb all the CPES that it will.
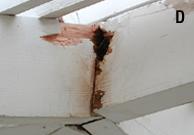
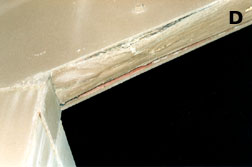
Junction points on beams are also prime locations for the development of rot, primarily because moisture becomes trapped within the joint seams. Picture D is a good example of what can happen.
Repair for this type of damage is as follows:
1) Drill some small holes to determine the extent of the rot inside the beam, and/or probe with a piece of stiff wire to determine degree of damage.
2) Remove any loose wood.
3) Allow area to become reasonably dry.
4) Squirt, brush, or spray CPES into the area, making sure that all wood has been saturated.
5) Wait for 3–4 days (or longer).
6) Fill with our Fill-It Epoxy Filler. This can be done sequentially, if required; that is, a gross fill which is allowed to cure, and then followed with a finish fill. It will all bond together chemically.
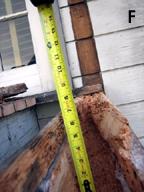
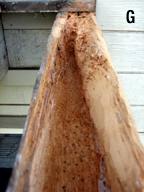
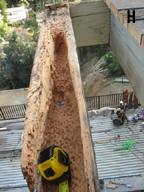
Pictures F, G and H show badly rotted exterior deck beams/joists. The rotten wood has been removed exposing large voids. In this case more than 50% of the wood has been removed and so repair will require bonding in pieces of new wood, or using metal to reinforce the beams. The filling and bonding-in of the reinforcement can be done, after the treatment with the CPES, with a mixture of our Layup & Laminating™ Epoxy Resin and sawdust or wood chips. This mixture can be as thin or as thick as you wish. If the beam extends into the building, the reinforcing material will have to be inserted and epoxy-bonded into the interior beam through augured holes. “Sistering” the beams with new, through-bolted wood is sometimes also a satisfactory solution. Be sure the new wood is CPES treated for protection against rot, including the drilled bolt holes. If you have questions or concerns about the strength of this type of repair, we strongly urge you to consult with a registered architect or professional engineer.
More frequently, the damage to the beam will not be as severe, as in picture I, and the repair procedure should be as outlined above: Saturation with the CPES, followed several days (or longer) later with the Layup & Laminating Resin and sawdust, with our without new wood to help fill.
If the deterioration is on the inside of the beam and you wish to preserve the beam face, then the repair procedure is as follows:
1) Remove all loose wood that is accessible.
2) Using a 1/4″ drill bit, drill downward-sloping holes into the interior of the badly deteriorated portions. Drill these holes as close to the top as possible. Gravity will pull the product down into the wood.
3) Pump or squirt our CPES (Clear Penetrating Epoxy Sealer) into each hole. Some may quickly leak out of holes or cracks in the sides of the beam. This all happens quickly. Brush-coat any deteriorated exterior portion of the beam with the CPES, allowing the wood to absorb all the CPES it will.
The CPES is doing three things: It’s inactivating all fungi/bacteria, hardening soft wood, and setting up an epoxy primer base for the subsequent epoxy material. Both the CPES and the resin have a slight amber color, and this will drip down through any exterior cracks or holes. If there are any surfaces underneath that you don’t want resin on, cover them with a poly tarp before beginning the process.
4) Wait for about a week (or longer).
5) Using our re-usable caulking tubes (10 oz size), pump pure Layup & Laminating Resin into the holes. Generous amounts of the resin should be pumped in, but not to the point of fill. Holes where the Layup & Laminating Resin might leak out can be closed with 2″ clear packing tape, or with cardboard covered with plastic kitchen wrap or waxed paper.
6) Wait for a day (or longer).
7) Repeat the process above, only this time use the Layup & Laminating Resin mixed with sawdust or wood flour (we sell wood flour if you need it) to make a soft slurry, about the consistency of very heavy syrup, and pump that into the same holes.
8) Wait for a day (or longer).
9) Mix a heavy mixture of the L&L Resin/sawdust, about like heavy peanut butter, load the 10 oz caulking tube, and pump that into the holes until they are filled.
10) Mix the L&L Resin/sawdust to a thickness that will “hang” and apply that to all vacant areas on the log exteriors. This can be done sequentially; that is, a gross fill followed by a finish fill. This should be as smooth as possible because once cured the mix is almost impossible to sand. Or use an epoxy filler for finishing, as it is easier to sand.
Basically, that’s it. A strong repair. The color of the L&L Resin/sawdust or epoxy filler will be about as shown on this link on our website, along with variations by using our Epoxy Coloring Agent.
We have a customer who sent in their pictures after repairing their beams with the above method, see the 1850 Beam Renovation for them.
Click on photos to see larger images.
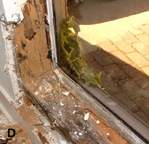
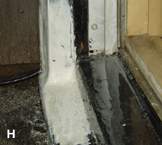
Window Sill and Frame Rot
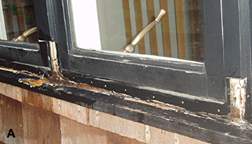
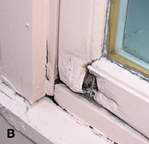
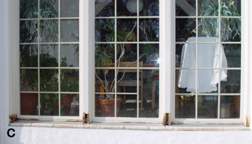
Window sill and frame rot is a common problem because water leaks in around the paint/caulk and the heat from the sun cooks it all up into a perfect environment for rot fungi. To the right we show a picture of mild rot where the moisture has gotten under the caulking (see picture A), and a picture of severe rot where moisture has simply gotten under the paint. (See picture B). The rot may also get into the window/door framing. (See pictures C and D).
CPES™ (Clear Penetrating Epoxy Sealer) is always the first product applied. It penetrates deeply, hardens the wood and virtually rot-proofs the area. After several days you are free to come back with our Fill-It™ Epoxy Filler and fill all voids. The Fill-It chemically bonds with the CPES treated wood and produces a structural repair.
The sequence for repair is basically as follows:
1) Remove any loose wood.
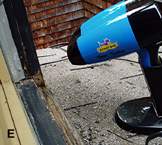
2) Make sure the wood is reasonably dry. (See picture E). Use a hair dryer for awhile if there is any doubt. Slightly damp is okay.
3) Scrape off paint around the affected area, or, better yet, the whole sill.
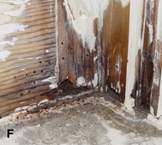
4) Apply our CPES (Clear Penetrating Epoxy Sealer) to the sill, allowing the wood to absorb all the CPES that it will. If rot is into the framing, drill small downward-sloping access holes for the injection of the CPES. (See picture F).
5) Wait for 2–3 days (or longer).
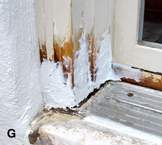
6) Return and fill all vacant areas with our Fill-It Epoxy Filler. This can be smoothed off and will cure hard in 24 hours. It can be sanded smooth after it cures. The Fill-It is a permanent fill… it won’t crack or pop out. (See picture G for a gross fill and picture H for a sanded fill).
If the area requires a more fluid fill, our Layup & Laminating Resin can be used, or a slurry mix of the Layup & Laminating Resin and our sawdust. Either the Fill-It Epoxy Filler or the Layup & Laminating Resin can be pumped into voids with our Re-Usable Caulking Tubes.
7) Re-paint the sill, directly over the CPES’d surface. Any type of paint will work just fine.
Deteriorated shutters and doors and door sills can be repaired using similar techniques. There are several window repair projects sent in by different customers see our Customer Projects page to see the different repairs and how they were completed.

Doorway Thresholds
Doorway thresholds are another area that is rot prone due to moisture and heat. Use a knife or ice pick to determine the range and depth of the rotten wood. Remove any wood that is totally loose and rotted. At joints use a drill to penetrate into hidden areas that may have rot. You can see what comes out with the drill. Soak it all in CPES™ and then go back and make any fills using Layup & Laminating Epoxy Resin™ if deep rot and Fill-It™ Epoxy Filler.
Doors and doorway frames can be repaired in a similar manner. Always start at the top so that the CPES™ runs down. Paint/finish must be removed from deteriorated area first so the CPES™ can penetrate. Drill if necessary to get depth.
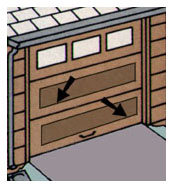
Garage Doors
Many garage doors have a bottom reinforcing panel that collects water which seeps between the panel and the main door structure. Wood deterioration is often the result, especially if the door is on the sunny side of the house. This is a perfect location for using the Clear Penetrating Epoxy Sealer™. The area can be dried and scraped out, and then CPES™ injected or brushed into the gap. After it cures, either Layup & Laminating Resin™ or Fill-It™ Epoxy Filler can be laid in and the whole area re-painted. It’s easy, quick, and a lot cheaper than replacing the panel or the door.

Gates, Fences, Posts and Other Ancillary Pieces
Some of these are difficult to replace. It’s worth some effort and Clear Penetrating Epoxy Sealer™ applied in advance to resist rot from getting started. Fence post bases, screw holes for hinges, wood joints, gate joints, etc. are all prime candidates for future rot. Protect them first.
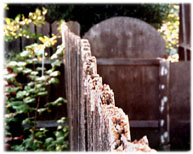
Even the casual application of CPES™ to end-grains can resist the kind of fence-top deterioration seen in the accompanying picture.
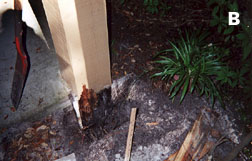
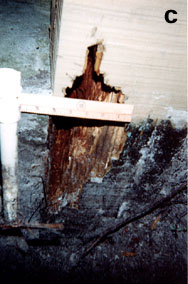
The photos (bellow) show an example of a Florida deck support beam (but the same holds true for any post buried in the ground) that was repaired by using CPES™, Layup & Laminating Resin and Fill-It™ Epoxy Filler. Photo “A” shows the extent of the problem after a little of the soil was dug away. Sharp probes were pushed through the wood to determine the extent and depth of the wood rot. More surrounding soil was cleared away and the deteriorated area completely exposed, as shown in photo “B” and in close-up in photo “C”.
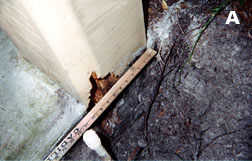
Wood must be reasonably dry before CPES™ and subsequent products can be applied. In this case the home owner rented a kerosene heater/blower and dried the wood thoroughly. He then saturated the wood with CPES™, after drilling some CPES™-access holes above the visibly rotted area to be sure saturation was complete. He then waited 4–5 days for the CPES™ to vent away all carrier solvents, and then applied Layup & Laminating Resin over the deteriorated surface (especially the bottom) and into the access holes via a turkey baster. After a 24 hour cure-time, the whole area was then filled with the Fill-It™ Epoxy Filler. This had to be done in several applications to prevent sag-out. The job was completed. The compressive strength of our epoxies is greater than the wood surrounding it.
The material to complete this repair was 2 quarts of CPES™, 2 pints of Layup & Laminating Resin, and a 1 gallon unit of Fill-It™ Epoxy Filler. The cost was $257.68. Compared to the cost of replacing the post this is inexpensive, and the repaired area is stronger than it was originally and free of rot.
Another customer repaired their Porch Pole which was on concrete and sent us the pictures of their work.
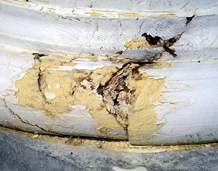
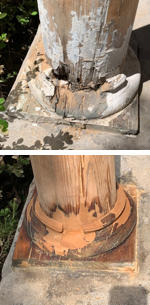
Column Rot
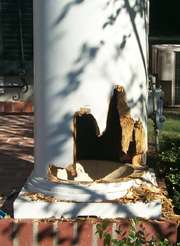
Columns can have severe wood deterioration problems because they are usually hollow. The inside wood is untreated and unprotected, and moisture seeping up from the bottom will quickly lead to severe wood rot. We have a picture here of a severely damaged column after the rotten wood has been removed.
Repair is as follows: First, treat the columns with the CPES™ (Clear Penetrating Epoxy Sealer™), including all the exposed faces, the immediately surrounding wood (after the paint is removed), and the base intersection between column and its support. Next, using a garden sprayer, the insides of the columns should also be treated with the CPES™. Treating the insides of the columns is extremely important, because the wood inside is very vulnerable and CPES™ will significantly reduce the chance of any future wood deterioration. During use the sprayer can be cleaned with lacquer thinner, which will flush the curing epoxy out of the valving.
After the CPES™ cures, the hole needs to be filled with Fill-It™ Epoxy Filler. For large open holes, the easiest way to do this is to make a backing surface. There are two ways that this can be done:
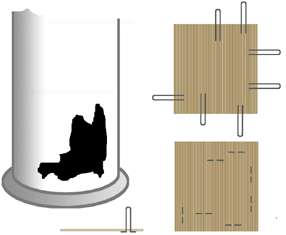
The first is to cut a piece of corrugated cardboard 1″ larger than the size of the hole. Bend pieces of wire in half around your finger and push both ends through the cardboard about 1 1/2″ from the edge of the cardboard in various places. Bend the wire ends outward on the inside. Put Fill-It™ around the interior edge of the hole to secure the cardboard in place. Bend the cardboard so it can be inserted into the hole. Using the wires as handles, pull the cardboard outward. Bend the wire around the outside of the hole to hold the cardboard in place while the interior edge of Fill-It™ cures. After the interior edge of Fill-It™ has cured, cut the wires off flush with the cardboard and use the Fill-It™ to fill in the missing wood. After curing, sand the filler to shape and paint.
The second alternative is to fill the inside of the column with enough expandable foam (the canned version sold at home stores will work) to serve as the backing. Excess foam can be carved away after it cures. This method of backing should not be used unless the column is first thoroughly sprayed inside with the CPES™. Foam next to untreated wood traps moisture and promotes wood rot.
 Click image to enlarge
Here is a picture of a less severely damaged column. This would be repaired by removing paint from all affected surfaces, removing any loose wood, saturating the area with CPES™, and then several days (or longer) later coming back and filling all cracks and vacancies with our Fill-It Epoxy Filler. Ideally, the whole base of this column would be treated with the CPES to prevent recurrence of the deterioration elsewhere.
When it is the detail work that is damaged, that can be built back with surprising results. First treat the surrounding wood with a penetrating epoxy, then build back with your choice of the fillers. Forms can be built if you have lots of them to do. You can also fill in a close approximation to the desired shape, then sand to finished shape and paint.

A customer sent in their pictures of their Creative Column Reconstruction, once it was done you would not even know it had been repaired.
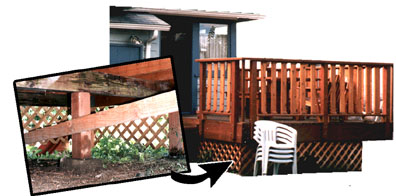
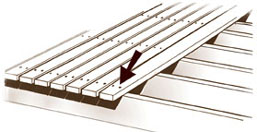
Decks and Deck Railings
Decking fails most often because of a fundamental flaw in how they are treated during assembly. Common deck construction places the upper surface planks across and perpendicular to 2″ X 12″ joists set on edge. The planks are screwed or nailed to the joists, puncturing both wooden members. Inevitably a thin air space exists between each deck plank and joist. This very thin gap opens up as the structure moves with changing age and weather conditions. Rain falls and dew condenses at night, allowing water to collect in these narrow dark spaces. Warmed by the sun, the spaces become a breeding ground for natural bacteria and fungi. The wood deteriorates and rots.
You can replace or you can repair, if the damage is not too great. If the underside of the deck planks show deterioration up to a third of the plank thickness or less, and the joist the same degree of deterioration, restoration is possible. Sistering new wood next to the damaged joist is advisable. If you have questions or concerns, we strongly urge you to consult with a registered architect or professional engineer, and the repairs done in full conformance with building codes and existing regulations.
Restoration begins with the disassembly of the top of the deck. Screws are removed, or if nailed the plank can usually be broken loose from below with a large hammer or maul. Sometimes a few hits from below to loosen and then a sharp strike on top will make the nail stand proud for pulling. Use a pencil to number the planks so that they can be replaced in the same order. Place the planks upside down and using a wire brush lightly scrub the area where plank and joist met to remove any loose, deteriorated wood.
Soak the bottom of each plank with Clear Penetrating Epoxy Sealer™. If it’s important to preserve the weathered appearance of the deck, then turn the plank over within about 1/2 hour and solvent-clean with Lacquer Thinner to remove any CPES™ that might have soaked through to the top side. If this isn’t done before the epoxy cures, there will be visible patches of epoxy on top. Allow deck planks to dry at least 48 hours with bottom side up. Now repeat this same process with the joists, allowing for extensive and prolonged absorption at bad wood areas. If CPES™ impregnation is deep, up to 2 weeks may be required for solvent evaporation and epoxy cure. Generally, when the location no longer smells strongly the restoration process can continue.
Replace any volumes of missing wood with Fill-It™ Epoxy Filler. It can be sanded or shaped with normal woodworking tools.
When the planks are ready for replacement, put into position and drill pilot holes for nails or screws. This is particularly important if you are going through the Fill-It™ Epoxy Filler. Sister any joists that require it. We recommend a clear grain fir with few if any knots. Coat the sisters with the CPES™, especially the end-grain.
Now, at this point we recommend using a 100% polyurethane sealant between the sister and the joist. Our Dymonic® FC would be a good choice. Apply the material to both surfaces, and screw or nail the sister to the joist. When the polyurethane has cured, use a knife to carve away any excess that may have appeared at the top edge of the original joist.
Replace the planks in sequence using the same method as above, including drilling the pilot holes. Apply the 2-part polysulfide to the joint and drive the nails or insert screws through the uncured mixture. This is a method used on boats and the life of the repair usually exceeds the life of the deck.
Your deck is repaired! We had a customer who did this on their deck, the project is very well documented and thorough check it out… Half-Round Deck.
For new construction, or you're re-building a deck the application of Clear Penetrating Epoxy Sealer™ to crucial areas such as plank/joist junctures can save you a lot of work later on. These are the critical areas where nails puncture the wood, gaps exist where water seeps in, the sun warms, and eventually the wood is liable to deteriorate. Most rot starts where water can wick in. CPES™ applied to these areas in advance can resist problems. Consult with your architect or construction engineer. But a couple of hundred dollars in extra materials can save you much more down the road.
Deck railings, more often than not can be easily and more cheaply replaced than repaired. As always, if putting in new wood, keep in mind that sealing the wood from moisture helps it to last much longer and the clear penetrating epoxy sealer goes a long way as a primer/sealer. When the deck railings are decorative or as in our customers Half-Round Deck a lot more work went into making the railing and it’s cheaper or less labor intensive than to re-build it.
UV Light Damage To Wood
Click on photos to see a larger view.
Wood can be deteriorated by ultraviolet (UV) light. This problem is most common in the southwestern states where wood beams and siding on buildings are exposed to long periods of intense sunlight.
Wood deterioration caused by UV light is different in type and appearance from deterioration caused by rot fungi. It is more diffuse and generalized over the wood surface. The softer summer growth is more susceptible to UV damage, leading to greater erosion in these areas of the wood. Beam ends can be particularly vulnerable.
The pictures we show here are from a Southern California home. You can see the severe etching of the wood, and the pitted ends. The dark sealer coat is breaking down under the UV light and exposing bare wood.
Effective restoration of UV damaged wood requires saturation of the wood surfaces with CPES™ (Clear Penetrating Epoxy Sealer). The UV damaged wood is much weaker than the undamaged wood, and must be restrengthened if a lasting repair is to be achieved. The wood should be allowed to absorb all the CPES™ that it will, and this can be a considerable amount on this type of deterioration. The CPES™ will serve to fill and bond in the tiny spaces that exist between the wood fibers, restoring strength. If protected from additional UV light, the treatment with CPES™ is permanent. Once in the wood it will not come out.
Protection of the CPES™ treated wood surface requires a coating that is very resistant to UV light. Epoxies are not made to be UV resistant, they must be coated in order to protect them.
The only clear coatings that can supply this high level of protection are marine-grade varnishes. It’s certainly possible to varnish beams and siding, but at least three coatings will be required and it will have to be recoated annually. Not much fun!
Opaque coatings, such as paint and polyurethanes, are more practical. Good paint will withstand the UV light for several years, and then have to be repainted. An option to painting is sealing the surface with our Elasta-Tuff™ 6000-AL-HS, a very tough polyurethane coating that is totally UV resistant and will last 10–15 years without recoating or losing color. At least two coats are required. You can get additional details on the Elasta-Tuff™ product information page

Termite and Boring Insect Damage
While termites are the home owner’s main concern, there are a variety of insects that can and do penetrate wood. Other insects such as a variety of ants, beetles and bees often simply use the wood for home and breeding space. Their damage is not so extensive, but does provide an access for water to get into the wood. It’s not uncommon to see extensive fungal rot in areas where insects have penetrated.
Termite and boring insect tunneling is often on main frames or sill timbers, and in due course will cause major structural damage. Most often the damage is in inaccessible areas. Replacing the timber is not always an option, and even if it is, replacement can be expensive. What needs to be done is to restore structural strength to the timber, and to seal the wood so that bacteria and fungi (and insects) won’t have access to the interior.
Click on pictures to enlarge.
If the surface is painted, there will be no evidence of the repair. Any testing done by home inspectors will reveal only an extremely hard surface, much like the good wood surrounding the repair. On unpainted surfaces, finish putty can be made by adding sawdust to a mix of the L&L Resin until a spreadable consistency is reached. Finish off smoothly. Once cured this mix is very difficult to sand smooth. The L& L Resin and sawdust give a toned fill that approximates the color of the original wood. Or the use of an epoxy filler, which is easier to sand, toned with our Epoxy Coloring Agent can be used to finish off the fill.
Epoxy treatment will provide an all-around solution. For starters, no insect can survive immersion in epoxy! The most important point to this solution is that epoxies are by far the best way to restore strength to damaged wood. They are extremely strong, bond easily and strongly with the wood, and have an indefinite life. But you have to use the right epoxies…
The damaged area must first be treated with a penetrating epoxy, to harden the wood and encapsulate any bacteria or fungi, and then either a flowable thick epoxy added to penetrate the insect tunnels or, if access is clear, an epoxy filler applied to build back bulk and bond with the CPES™ treated wood. The flow-able epoxy must be extremely slow-setting to allow time for it to migrate to all open areas. Our Layup & Laminating™ Resin is the slowest-setting epoxy we know of.
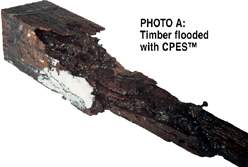
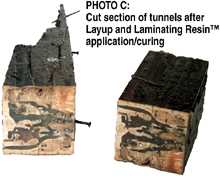
The photos show a badly damaged piece of wood (two pieces, actually, but both from the same timber and both damaged) that were deteriorated by both termites and fungal rot. PHOTO A shows the piece after it has been flooded with CPES™ and then Layup & Laminating™ Resin. When the CPES™ was applied the termites rushed out and were encapsulated.
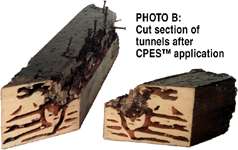
PHOTO B shows a cut section after it had been treated with CPES™, but before it was flooded with Layup & Laminating™ Resin. You can see that the termite tunnels are darkened by the penetrated CPES™, but that the good wood remains unaffected. CPES™ only deeply penetrates deteriorated wood. The dark brown material is rotted wood and termite residue that has been penetrated and turned hard by the CPES™.
PHOTO C shows a cut section after the termite tunnels were flooded with Layup & Laminating™ Resin. They are now solid resin, bonded to the CPES™, which is in turn bonded to the wood. This wood is strong. You could drive a spike with it.
Repairing Insect Damage
The repair process is fairly simple:
1) Dry the wood if it is damp.
2) Flood it with CPES™, through open tunnels, or through drilled access holes, allowing the wood to absorb as much as it will. If done in an enclosed space, we strongly recommend the use of a cartridge respirator, such as the Moldex unit we sell. Allow the CPES™ to cure.
3) Wrap any open areas with kitchen wrap (Saran Wrap) to keep the L&L Resin from escaping, and then flood the tunnels with the resin. This may take awhile, because as the resin settles into place you will have to go back and add more. If the voids are large, you can finish the flow with a pourable slurry of L&L Resin and sawdust. Remove the kitchen wrap after 24 hours and you are through.
An Epoxy Filler can be used to enclose large open areas. It will bond strongly with the penetrating epoxy or epoxy resin treated surface.