
Home > Log Home- Insect Damage
Repairing Termite and Boring Insect Damage
Log homes are particularly vulnerable to termite and insect damage. They are made of big (attractive to insects!) pieces of wood and they are often located in rural and wooded areas where insects abound. Insects love log homes! While termites are the log home owner’s main concern, there are a variety of insects that can and do penetrate wood. Other insects such as a variety of ants, beetles and bees often simply use the wood for home and breeding space. Their damage is not so extensive, but does provide an access for water to get into the wood. It’s not uncommon to see extensive fungal rot in areas where insects have penetrated.
The damage is often not severe enough per se to require immediate repair. But the insects should be eliminated and, more importantly, the area sealed off so that moisture won’t accumulate inside and lead to fungal rot damage. If this occurs, then the entire center of the log can be hollowed away and a large repair required.
Unfortunately, termite and boring insect tunneling is often on main frames or sill areas, and in due course will cause major structural damage. Replacing logs is not always an option, and even if it is, replacement can be expensive. What needs to be done is to restore structural strength to the log, and to seal the wood so that bacteria and fungi (and insects) won’t have access to the interior.
Epoxy treatment will provide an all-around solution. For starters, no insect can survive immersion in epoxy! The most important point to this solution is that epoxies are by far the best way to restore strength to damaged wood. They are extremely strong, bond easily and strongly with the wood, and have an indefinite life. But you have to use the right epoxies…
The damaged area must first be treated with the S-1™ Clear Penetrating Epoxy Sealer, to harden the wood and encapsulate any bacteria or fungi, and then either a flowable thick epoxy, such as the General Purpose Epoxy™ Resin added to penetrate the insect tunnels or, if access is clear, an epoxy filler such as the Sculpwood® Epoxy Paste or Sculpwood® Moldable Epoxy Putty applied to build back bulk and bond with the S-1™ treated wood. The flowable epoxy should be as slow-setting as possible to allow time for it to migrate to all open areas. The General Purpose Epoxy™ Resin has different temperature formulations so you can achieve the slowest-setting for your temperatures.
Click on photo to enlarge.
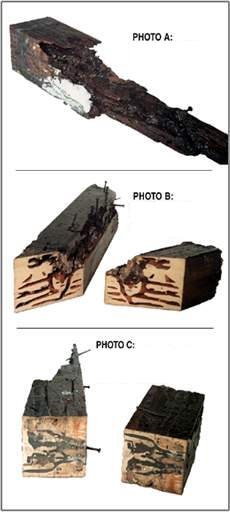
The photos show a badly damaged piece of wood (two pieces, actually, but both from the same timber and both damaged) that were deteriorated by both termites and fungal rot. PHOTO A shows the piece after it has been flooded with clear penetrating epoxy sealer and then filled with epoxy resin. You can see a termite corpse near the outer nail. When the clear penetrating epoxy sealer was applied the termites rushed out and were encapsulated.
PHOTO B shows a cut section after it had been treated with clear penetrating epoxy sealer, but before it was flooded with epoxy resin. You can see that the termite tunnels are darkened by the penetrated clear penetrating epoxy sealer, but that the good wood remains unaffected. Clear penetrating epoxy sealer only deeply penetrates deteriorated wood. The dark brown material is rotted wood and termite residue that has been penetrated and turned hard by the clear penetrating epoxy sealer.
PHOTO C shows a cut section (of photo A) after the termite tunnels were flooded with epoxy resin. They are now solid resin, bonded to the clear penetrating epoxy sealer, which is in turn bonded to the wood. This wood is strong. You could drive a spike with it.
Steps for Repairing Insect Damage
The repair process is fairly simple:
1) Dry the wood if it is damp.
2) Termites usually excavate in layers, going with the softest grain of the wood. Depending on how the wood is arranged, the cavities can be oriented horizontally or vertically. Since the channels are not exposed, usually, it is necessary to drill holes. Make sure to drill perpendicular to the direction of the cavities, so that all or most cavities are penetrated with each drill. If possible, drill near the top of the damage. Drill holes, near the top, every 3–6 inches, depending on the size of the damaged area approximately 1/8″–3/8″ (3–10 mm) in size. These holes will allow you to introduce the penetrating epoxy (S-1™ Clear Penetrating Epoxy Sealer) first, and later, the flowable epoxy resin (General Purpose Epoxy™ Resin) after the S-1™ Sealer has cured. Since the wood in the cavities isn’t usually rotted, you are looking to get a good wetting coat, without filling the cavities with the S-1™ Sealer. Let this cure for 3–6 days, or until the solvent odor dissipates.
3) Sculpwood® Epoxy Paste is great at filling smaller cracks to keep the General Purpose Epoxy™ Resin from leaking out. If you noticed the S-1™ Sealer leaking out, then it is best to mark these spots, and use the Paste to plug these leaks before filling the empty cavities.
4) After the S-1™ Clear Penetrating Epoxy Sealer (and Sculpwood® Epoxy Paste, if this was used) has cured, you can use the same holes to fill the channels with the General Purpose Epoxy™ Resin. Be cautious of leaks, as this leads to waste of product. It is best to pour the GP Epoxy™ Resin in using smaller amounts, in case of leaks. Keep adding more GP Epoxy™ Resin until product reaches the top of the holes. If you drilled some holes above, fill, and let cure the bottom holes before going to the upper holes.
5) If necessary, a thicker epoxy, like Sculpwood® Epoxy Paste, or Sculpwood® Moldable Epoxy Putty can be used to fill in any missing wood. This is usually only done if there is a larger void due to accompanying rot.
The Rot Doctor’s entire product line can be found on our Product Information page.