
Home > Log Home- Log Repair
Log Repair: Repairing Rot Damage in Your Log Home
We discussed in the protecting your log home against rot section the minor repairs you can make to the checks, cracks, knots and the odd soft spot on the log. But what do you do if you have major log rot? Large sections of a log are rotted, or a whole group of logs are bad? Serious business! Log replacement would be ideal, and we encourage it if you can manage it or afford it. But what if you can’t?
In our experience applying a high quality penetrating epoxy properly is the key to a strong durable repair. Its application is the first and most important step you can make toward restoring rotten logs. After the S-1™ Clear Penetrating Epoxy Sealer a lot of things will work - but only after the S-1™ Clear Penetrating Epoxy Sealer.
Before you can fix the rot, you need to find out the extent of the damage. Most of the time, our customers are dealing with rot in the middle of the log, from water getting in to the cracks on the upper half of the log. The water sits in these, and keeps the center of the log wet enough to rot.
Since the outer shell stays dry enough to keep from rotting, spotting rot before it gets really bad takes some investigation. Once things get bad enough, the outer shell will flex just from pushing on it. Before it gets that bad, it is possible to find damage by knocking on the exterior with the butt of a large screwdriver, or the head of a mallet. Before that is even useful, probing the bottoms of the cracks, especially the bigger ones, with a sharp instrument is great for finding where the rot is just getting started. We like a bigger fillet knife. Between these methods, it is possible to find any significant rot pockets. Typically, it is the lower logs, especially under windows. Large picture window sill logs are particularly prone to rot.
S-1™ Clear Penetrating Epoxy Sealer application to bad logs is not a quick process. The bad wood must be reasonably dry. If it’s not, then you have to dry it. Large kerosene blowers (80,000 btu) are available from rental stores at a reasonable price, and they can dry a lot of wood quickly. Compressed air pumped through wood will also dry it quickly. S-1™ clear penetrating epoxy sealer has to be applied to the interior of the log as thoroughly as possible. It has to be allowed to cure and the solvent mixture to evaporate away. This takes time.
Depending on your situation, there are two ways to go about this, and we outline them here:
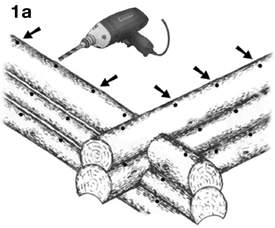
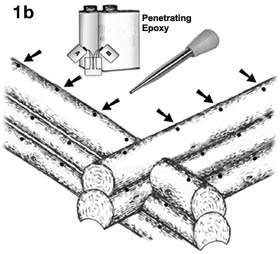
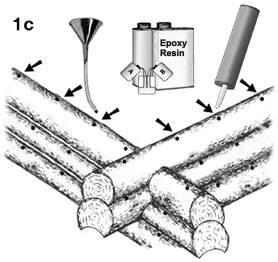
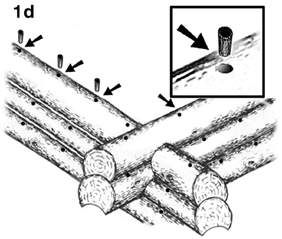
Repair Method 1: Drill and Fill
Drill and fill is for when you know that the rotten interior is intact, reasonably dry and you just want to saturate the bad wood with S-1™ Clear Penetrating Epoxy Sealer to stop the rot and restore solidity to the wood.
(1a) Drill 1/4″ or larger holes about every 6 inches as high up on the rotted section of the log as possible. Drill alternating holes at shallow and steep angles, 30°, 45°, 60°. Drill deeply and inspect the wood coming out. Is it reasonably dry? If not, provide a loose plastic cover and allow air to circulate through to dry wood. This may take several weeks.
(1b) When wood is reasonably dry, inject all the S-1™ Clear Penetrating Epoxy Sealer the log will conveniently accept. Large cooking basters or garden sprayers are ideal for applying large quantities. Or you can use a funnel and hose. Allow 3–4 weeks for solvents to evaporate and the epoxy to cure. Again, cover with a tarp if wet weather is a factor.
(1c) Fill cavities under holes with the General Purpose Epoxy™ Resin/sawdust mixture that will bond with the S-1™ Clear Penetrating Epoxy Sealer. Do not use soft putties or fillers.
(1d) Apply General Purpose Epoxy™ Resin to bungs and drive them tightly into the holes, or fill holes with a putty mix of General Purpose Epoxy™ Resin and sawdust. Grind or chisel bungs smooth and coat exterior of bungs/logs with the S-1™ Clear Penetrating Epoxy Sealer. Apply whatever finish coating you choose, as long as it is a pigmented stain, or a clear coating with a UV inhibitor.
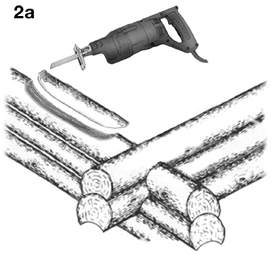
Repair Method 2: Rip, Dry and Treat
Rip, dry and treat is for when the wood is wet and badly decayed, or there is a large hollow vacancy that must be filled. You remove the exterior face of the log, treat the part of the log exposed by removing the face with the S-1™ Clear Penetrating Epoxy Sealer, fill the voids and replace the log face.
(2a) Use Sawzall or similar tool to cut away the exterior face of the log. Save log face for later replacement. Scoop away all loose, wet, decayed wood. Allow area to dry. If in a hurry, blow-dry with a rented kerosene blow-dryer. We’ve used the 80,000 btu units propped on a stand.
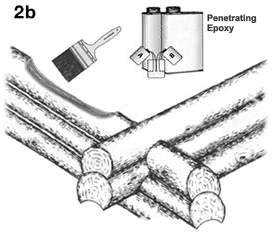
(2b) Apply the S-1™ Clear Penetrating Epoxy Sealer to interior of log and to facing that was cutaway. Use a large, disposable bristle brush and keep applying until the wood will accept no more. Allow 4–5 days for solvents to evaporate and the epoxy to cure. Additional S-1™ Clear Penetrating Epoxy Sealer access holes can be drilled in the interior if you think it is necessary.
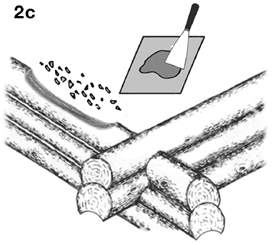
(2c) Fill hole with pieces of wood that have had the S-1™ Clear Penetrating Epoxy Sealer applied for rot protection. Use the General Purpose Epoxy™ Resin/sawdust mixture to fill in around them and close gaps. Do not use soft putties or fillers.
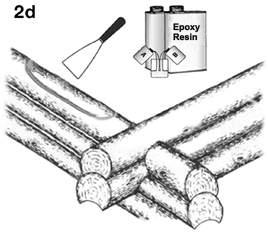
(2d) Apply General Purpose Epoxy™ Resin to cut log surface and replacement piece. Put in position and allow epoxy to cure (1–2 days). Smooth log exterior surface and coat with the S-1™ Clear Penetrating Epoxy Sealer. Apply whatever finish coating you choose, as long as it contains a UV inhibitor.
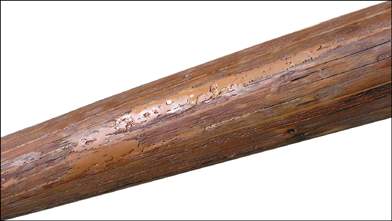
Here is a sample log that has been repaired. Before the cracks were filled, they were saturated with a penetrating epoxy. S-1™ Clear Penetrating Epoxy Sealer flows where the water flows and hardens any soft wood it encounters. It also virtually eliminates the possibility of future rot or deterioration inside the log. This is a particularly good use of the S-1™ Clear Penetrating Epoxy Sealer on a log home, particularly on all upward-facing cracks.
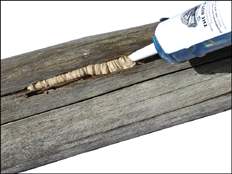
The photo (left) shows a mix of colored filler being pumped into a crack with one of our re-usable caulking tubes. The General Purpose Epoxy™ Resin/sawdust mix can be pumped into a crack in the same way. The filled areas were sanded and then stained. The key to getting the filler a near color is to put down a sample of the stain and then mix our Epoxy Coloring Agent: Brown in with the filler until a close color is matched.
Click on images to see enlarged photos.
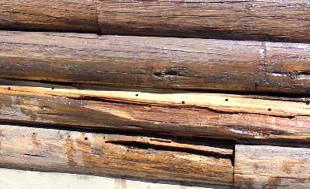
The photos above show this same filling process on a log home, before and after. Note that the affected logs have had holes drilled at the top edge for the injection of the S-1™ Clear Penetrating Epoxy Sealer into the log interior.
The above is for log rot starting at the checking. The second most common place for log rot is the ends. This is usually more visible, at least once it gets more severe. And the repair is more straightforward.
The rot tends to taper as it gets deeper in the log. Dig out as much of the rot as you care to. It is best to remove anything that crumbles easily. Make sure the remaining wood is dry. Saturate with the S-1™ Clear Penetrating Epoxy Sealer. Let this cure for several days, to a week. You are waiting for the solvent odor to reduce significantly.
At this point, an application of an epoxy paste like the Sculpwood® Epoxy Paste is the best step. While the entire cavity can be filled with an epoxy, it is more economical to fill as much of the void with wood as is practical. Pack in some paste, put in wood, either one large piece, or a bunch of smaller pieces, your preference. Make sure each piece is well packed with paste, and let things cure. This can be done in one go, or several, letting things cure between applications.
If you have larger cavities to fill, and you don’t want to use wood, a thicker epoxy filler, like the Sculpwood® Moldable Epoxy Putty can be used. As this is somewhat dry, it is useful to pack the putty into a thin layer of the paste, done while the paste is still wet. Again, this can be done in one go, or several applications.
A customer sent us before and after photo’s of their corner rot repair using clear penetrating epoxy sealer, epoxy resin/sawdust and new wood.
Log Repair: A Case Study
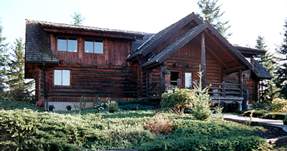
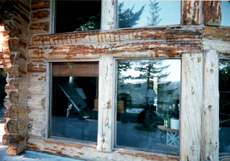
This is a picture of a beautiful log home in the Northwest. The picture to the right shows the front of the home, which faces the Northeast, away from incoming weather. Wide roof overhangs have kept much of the water off the entry area and the logs look presentable. To the sides of the entryway and on the broad face walls the overhangs are short, and the logs are discolored from running water. There was very little if any protective coating. Even so, because they get less rainwater, sun and air circulation, there was very little serious damage to the logs.
The back of the home has a broad concrete deck which drops off into a long valley and a lovely view of the Pacific Ocean and distant shoreline. We show you the deck and the view, which is to the Southwest.
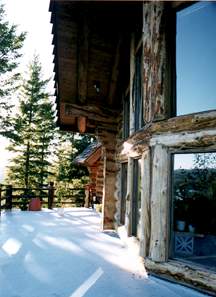

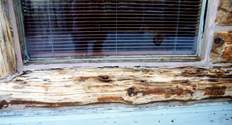
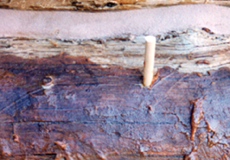
Unfortunately, it is from the Southwest that the strong winter storms arrive, with high winds and lots of rain. The protection of the roof overhangs helped near the top, but at the bottom there was extensive rot in almost all the logs. The sill logs directly under the windows, which caught the water running off the glass, were so soft they could be easily pushed in with your foot. They were virtually hollow inside. We show a picture of one sill log. You can see cracks, splits and knots where the water got inside.
The owner of this home discovered all these problems late in the season, just before the winter storms were due to arrive. The upper logs were less damaged and were okay to treat by method 1, drill and fill. The lower logs (especially under the windows) probably should’ve been treated with method 2, rip, dry and treat. There simply was no time to cut away the faces of the logs and get inside. His solution was to get as much clear penetrating epoxy sealer into these really bad logs as possible. His belief was that large amounts of the clear penetrating epoxy sealer would harden the wood it reached, discourage or encapsulate the rot fungi, and certainly create an internal environment that the termites found disagreeable. It would not solve the problems, but would at least help retard further damage.
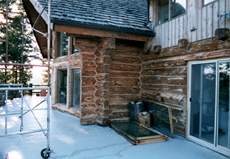
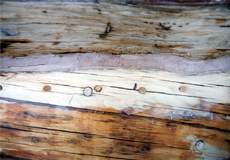
Staging was set up and the process begun. You can see in the next picture that holes have been drilled and clear penetrating epoxy sealer injected into the two logs between the windows. Closer detail shows holes that have been bunged closed after the clear penetrating epoxy sealer injection. We do not recommend this, but this owner had no choice. He was smelling solvent fumes for a long time. It is better, if possible, to leave the holes open for as long as possible to give the solvents a way to migrate out of the wood before plugging the holes.
A word of advice here…
A heavily saturated log may take 3–4 weeks before the solvent fumes are gone and the holes closed. In addition, the holes should be drilled as close to the top of the log as possible, and at varying angles into the log. Drill until you reach the pocket(s) of rot. This will ensure that the S-1™ Clear Penetrating Epoxy Sealer reaches all the rotted areas. If rain and bad weather are an issue, we recommend hanging large tarps to keep the area reasonably dry.
The first closeup picture shows bungs in place and some bungs trimmed off. We recommend using epoxy resin to seat the bungs and ensure that no water can enter. You can also see that a mixture of epoxy resin and sawdust has been smeared over the log surface to fill the small cracks. This forms a very hard fill that adheres strongly to the wood. Any crack that might capture moisture is better off being treated with clear penetrating epoxy sealer, and filled. Bigger cracks are more important, as they go deeper into the wood. The cracks on the lower half of the log, and any that are protected by roof overhangs do not need to be treated.
The next picture shows an area that has been injected with clear penetrating epoxy sealer, filled, and then ground down with a disc sander for final finish coating.

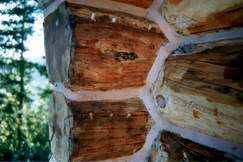
Overhanging log ends at the corners were also treated with clear penetrating epoxy sealer and filled with the epoxy resin/sawdust mixture. We also recommended that the log ends be thoroughly saturated with the S-1™ Clear Penetrating Epoxy Sealer, applying as much as the wood will absorb. S-1™ Clear Penetrating Epoxy Sealer will migrate in a long way with end-grain application.
The moral to this story is never let the situation become this bad. Constant attention to the home exterior and the use of appropriate products will prevent drastic measures later on. In our opinion every log home owner should have on hand some S-1™ Clear Penetrating Epoxy Sealer, some General Purpose Epoxy™ Resin and some sawdust. Both the S-1™ Clear Penetrating Epoxy Sealer and General Purpose Epoxy™ Resin have an extremely long shelf life if unmixed, kept in closed containers and kept above freezing.
The Rot Doctor’s entire product line can be found on our Product Information page.