Home > Customer Projects > RV Roof and Inside Wall Repair

Subject: RV Roof and Inside Wall Repair
Date: May, 2007
Note: all images can be seen in larger versions by clicking on them.
Below are some photos of a project I did to repair roof rot on my fifth wheel camper. I chose to use this method because I could do it myself with my own resources and skills. Otherwise, a lot of hardware, including the ladder and roof rack, the endcap and the filon outer wall would have had to be torn apart. It would have been a far more complicated and extensive project with, in my opinion, little or no improvement in the final product. In fact, I prefer it this way since I know how the fix was done. Plus, I would have had to contract it out, probably costing me thousands of dollars.
I used products from The Rot Doctor. I have no affiliation with the company. They were very helpful in discussing my options and in explaining the techniques to used their products. A good company to do business with.
Brian N.
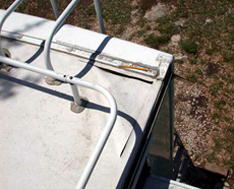
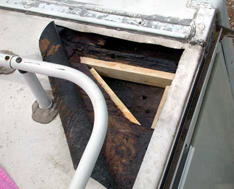
1. I used a box knife to cut the rubber roof in the corner.
The leak was just above the pencil where the trim molding meets the end-cap. It probably leaked from the time the unit was new, as the roof was very soft in this corner, and we’ve been in drought conditions for two years.
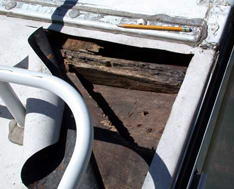
2. Folding back the rubber revealed the rotten area. Here I’ve already cleared out what soft rotted wood I could with my bare hands. Next I cut a diagonal with a keyhole saw to clean up the edge where it was feathered from rot.
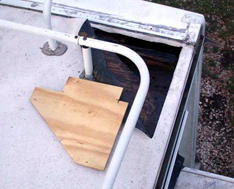
3. I cut a piece of plywood like a puzzle to match the shape of the hole I made in the roof. I don't have a lot of tools, so I just used a handsaw. Nothing fancy here.
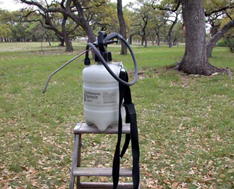
4. Here’s the sprayer I used to apply the CPES* from The Rot Doctor. With its 18″ metal “wand” I could probe into the 2″ space between the roof and the ceiling . I also inserted the wand down into the void between the wall and the outer filon to saturate the structural members with CPES*.
I was able to apply CPES* well past the areas that were discolored by water, thereby inoculating them against further rot.
5. After spraying the CPES*, I glued in some 1 x 2″ pieces of wood to add support when I inserted the piece of plywood.
At this point, I spread Fill-It Epoxy Filler* from The Rot Doctor into the entire exposed cavity and then glued in the plywood piece. Finally, I applied more Fill-It* to the area, paying special attention to the small gaps between the puzzle piece and the roof.
Once the Fill-It* cured I sanded it down smooth.
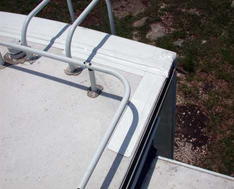
6. Here’s the finished roof sealed up with Eternabond tape. I ran a strip of Eternabond all the way across the camper where the roof meets the endcap. Any worries of a leak here are a thing of the past.
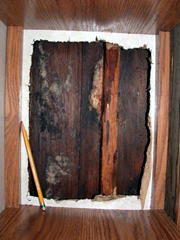
7. I also had rot in the wall directly below the area on the roof. I accessed it through the cupboard.
Here I’ve torn out the wall material and wet insulation to reveal the area affected.
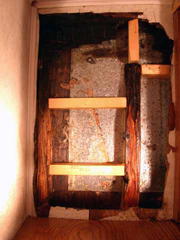
8. I thoroughly dried the area for several days using the exhaust side of a small vacuum cleaner, inserting the hose between the inner and outer walls. When it was thoroughly dry I coated everything with CPES*, using the bug sprayer to penetrate into otherwise inaccessible areas.
I added 1 x 2″ reinforcement pieces to strengthen the area. Note the top 3-4″ of the stud was completely rotted away.
I believe at this point the structure is as solid as the original manufacture.
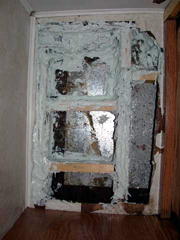
9. I spread Fill-It Epoxy Filler* throughout the area. Not pretty, but then it will be covered up later. The stuff goes on like a thick and sticky gel, then dries to a very hard material that bonds to the CPES* I had sprayed onto the wood.
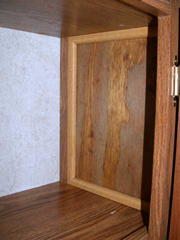
10. Finally, here’s the finished product.
Total cost was about $200.00 plus several hours of my time.
* These products are unavailable, we are selling comparable products that will perform these same tasks. Feel free to contact us if you need assistance with which products to use.