Home > Customer Projects > Window Restoration Project in TX

Subject: Window Restoration Project in TX
Date: 2004–2005
Note: all images can be seen in larger versions by clicking on them.
Home > Customer Projects > Window Restoration Project in TX
Date: 2004–2005
Note: all images can be seen in larger versions by clicking on them.
Dear Rot Doc,
Wanted to send you this note and photos of the ongoing restoration of my old house in TX. This house was built in 1926 and has a few areas of rot around the windows and door. We don’t get much rain down here but when it does it pours. The sun is the other enemy, weakening the paint and letting the water get in. Here are some photos and an explanation of the work. I used your epoxy based Rot Doc products through out this work unless otherwise specified.
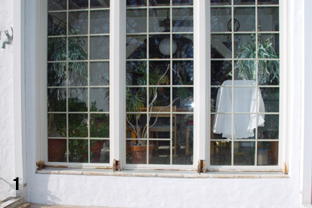
1. These are photos of our kitchen windows with rot at the bottom of all 4 trim pieces. Being unable to find matching trim and the length of the boards led me to believe it would be easier to repair these if I could find the right product.
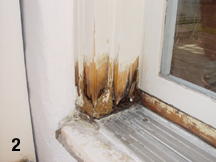
2. Close up of an area that had been repaired previously with a water based product. It continued to rot and the repair did not adhere to the wood well.
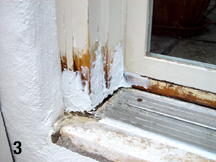
3. The same corner after CPES* had been applied and this is the Fill It epoxy* before sanding.

4. The same corner when done.
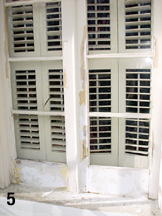
5. Another window that was heavily damaged by water coming off the roof. It also had been previously repaired with water-based products that did not last.
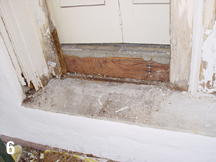
6. Same window, showing the left hand panel, with the stile removed. It was so rotten that I chose to replace it with wood. The rails shown are heavily damaged, as is the trim. The rails are soft with rot.
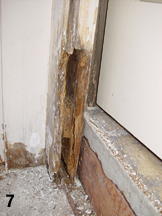
7. Close up of the rail. I think you can appreciate the rot better with this shot.
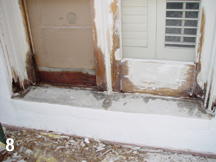
8. This shot shows both bottoms of the window after the application of the CPES*.
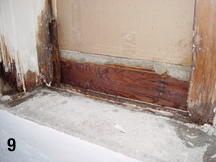
9. Detail on the left side. I used the Layup & Laminating* to strengthen the rotted soft wood. Brushed it on thick on all sides. Cured very well to accept the Fill It*.
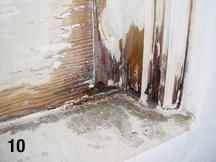
10. Detail on the right. The holes I drilled, as recommended on your site, to inject CPES* are easily seen here.
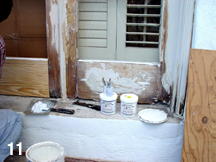
11. This shot shows the new stile in place (that was some creative woodworking itself) and the Fill It Epoxy Filler* being applied.
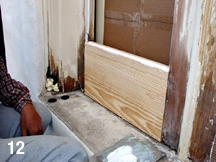
12. I used some foam filler to back up the large defect in the trim on the left. I did not get a shot after the Fill It* was applied but it looked the same as the first window only more extensive.
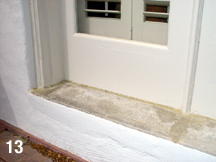
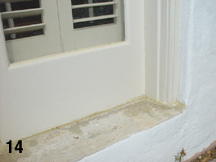
13–14. The finished Window. Looks very nice and this photo was done 5 months later. It is holding up very well. I repaired two windows like this that are 94 in tall. None of the stores have these nor can I find them on the WEB to price them. Your products are amazingly easy to work with and these projects did not take that much time.
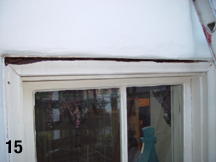
15. Another window with unusual rot on the top. This was from water cascading down the wall. The rot is fairly extensive and the wood that is showing is very soft. I applied the CPES* and then the Layup and Laminating Resin* was injected into the gap to solidify the soft wood. I left a lot of crumbly rotten wood in this one as the exterior skin was fairly hard. The gap was then filled with Fill It Epoxy Filler*.
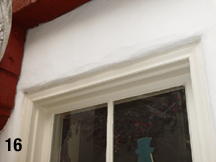
16. The finished window. It is quite hard and feels solid to knock on the wood now.
I did a few other smaller projects at the same time as these. For economy of mixing the products, letting them cure and my time it worked well. I am an amateur repairer and I was impressed how easy these are to use. I do have a paint grade respirator and I recommend the use of one for long exposures to the products.
I have another set of French doors I am working on now. They have extensive rot but with your products I am very confident. Good job and I will tell everyone about your products and web site.
Larry O.
TX.
* These products are unavailable, we are selling comparable products that will perform these same tasks. Feel free to contact us if you need assistance with which products to use.
Contact us by phone 206-364-2155 or e-mail (send us your pictures) at drrot@rotdoctor.com and we will gladly answer questions about our products or how to apply them. With 20+ years of experience and many more in the boating and construction industries, not much surprises us. We are here to help our customers solve their issues. Let us help you to not have any surprises in your repair project.
Our business hours are 6:30 AM to 5:30 PM Pacific Time, Monday–Friday.
Tech support is available over weekends and holidays 8:30 AM to 5:30 PM Pacific Time.
The Rot Doctor, Inc.
P.O. Box 30612, Seattle, WA 98113
Voice: 206.364.2155
Fax: 206.364.4744
E-mail: drrot@rotdoctor.com
The Rot Doctor, Inc. ©1997–2021. All rights reserved.