
Home > Product Testing > Strength Test

The Strength Test:
Deep Penetration and Structural Hardening with CPES™ and Layup & Laminating™ Epoxy Resin
The purpose of this product test is to demonstrate that the application of CPES™ (Clear Penetrating Epoxy Sealer) followed by Layup & Laminating™ Epoxy Resin to deep rot or deterioration in wood will produce a very strong repair.
We have previously used this technique on the rotten 8″ X 12″ horn timber aboard DELTA, our research boat, as well as interior beams and frames. Subsequently, many of our customers have used it in boats, homes, log homes, glue-lam structural beams, and structural posts and poles. This technique has been used as well on smaller wood repair projects such as window sills, garage doors, boat frames, and so forth, even though the rot is not so deep. The repair is strong.
The wood must be reasonably dry before the products are applied.
To demonstrate the penetration and strength of the CPES and Layup & Laminating Epoxy Resin for this article, we chose a 2″ x 2″ x 14″ balsa block with embedded sawdust to represent interior rot. We took it through several steps as shown in the following photos and diagrams.

Step 1
The balsa block was first cut across the width, then a “pocket” chiseled out of the top section and filled with sawdust. The two segments were bonded back together with the L&L Epoxy Resin to ensure that the CPES would move only through the sawdust area of the balsa block. After the epoxy resin set, we stood the piece on end and generously applied CPES tinted black with resin dye to the top end. We kept applying the tinted CPES to the top of the wood. After about 45 minutes, CPES started to wet the bottom. Even though it was still absorbing through the top, we stopped applying CPES as we felt that the wood was thoroughly saturated.
The CPES easily penetrated all the way through the length of the 14″ balsa block. Some CPES emerges out the sides; you can see the black flow-streaks in the picture. Note that the exterior flows start above the glue joint. The inset photo shows the bottom of the block: It is saturated with CPES and is quite hard. And note, too, that very few of the dye particles got through; they were filtered out by the wood fibers. We allowed about a month to pass so the CPES carrier solvents would have plenty of time to vent away and the epoxy set before beginning Step 2 of our testing.
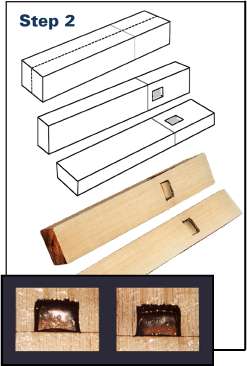
Step 2
We sawed the block in half lengthwise, exposing the pocket that contained the sawdust. The CPES had penetrated into the sawdust and saturated it with epoxy and collapsed it into a solid mass. It is a couple of millimeters smaller than it was when dry and unsaturated. The inset photo shows a close up of the sawdust block halved, the tops slightly dark from the dye and the bottoms a natural sawdust color. These sawdust blocks are very hard.
An interesting thing to note is that nowhere on the cut facings do you see black streaks of the dyed CPES flow. They are there, but it takes a magnifying glass to see them. CPES penetrates very small openings and channels and fills whatever tiny voids it finds.
Step 3
Next we cut two narrow channels from top to pocket in both sections of the block, then tightly rubber-banded the two pieces together. We applied Layup & Laminating Epoxy Resin to the top surface, just as we did the CPES. After about 8 hours, when the L&L Epoxy Resin was beginning to set, we separated the two pieces of block and allowed the resin to finish curing.
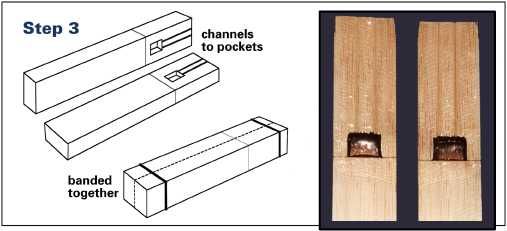
You can see the results in the photo. The Layup & Laminating Epoxy Resin penetrated down through the closed slit between the wood blocks and into the cavity containing the hardened sawdust. The resin’s total depth of penetration was 6 inches. Had we drilled the 1/4 inch holes we normally recommend it would have penetrated much further, but we wanted to demonstrate its penetrating ability within a very closed environment.
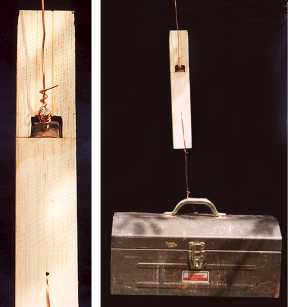
How Strong is this Treatment?
The final part of this test proves the strength of the bond between our products and the wood. We drilled a pilot hole in the CPES/L&L Epoxy Resin saturated sawdust and put in a #12 bronze wood screw. We then took copper wire, attached it to the screw and hung the thing from a tree limb. We show the screw, wire and CPES saturated sawdust block in the picture.
Then we hung a 20 lb. tool box from the bottom of the block and left it there for hours. When we took it down at the end of the day there was no indication that the screw had moved any significant amount.
Had this been a deteriorated wood repair in a structure it would have been very strong.
Test Conclusions
This demonstration makes several important points:
1) CPES will penetrate a long way through soft or deteriorated wood.
2) CPES used the remaining wood fibers (in this case, sawdust) as a matrix for the epoxy to bond with.
3) CPES makes the soft or deteriorated wood hard if saturation is complete and it is given sufficient curing time.
4) CPES is not a filler. It saturated and hardened the sawdust, but did not fill the resulting vacant spaces when the sawdust shrunk. On deteriorated wood that is more or less still complete, one or more applications of CPES will harden it sufficiently to accept fasteners and paint or varnish. If there are vacancies, then the addition of Layup & Laminating Epoxy Resin is required to make the strongest repair.
5) The Layup & Laminating Epoxy Resin applied over CPES treated wood will penetrate a good distance through a closed system, and even further if larger holes are drilled. L&L Epoxy Resin is a very strong, very slow-setting premium grade epoxy resin that even when cured retains the same slight degree of flexibility as the wood itself. It is very thick when first mixed but thins over several hours and gradually penetrates any vacancies and spaces in wood. It will cure at temperatures as low as 28° F (-2° C). We know of no other general use epoxy resin that has these exact characteristics.
6) When properly applied, the combination of these two products produces a very strong repair in soft or deteriorated wood, even though the deteriorated portion lies deep inside a larger piece.