Subject: A Consultation, Please… (insect damage)
Date: Tuesday, June 02, 2020
Hello and I appreciate that you are there!
First let me state that I have already used your products to great success in the restoration of a vintage trailer.
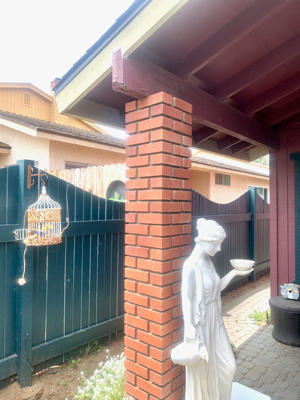
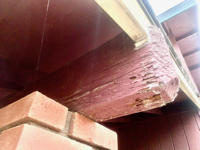
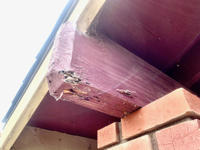
Attached are photos of a beam that has termite damage and is now hosting some carpenter bees.
What product would you recommend to caulk into / patch up this beam?
Thank you!
Larry
Larry,
Thanks for the images, they are very helpful. I would use several of our products. S-1 Sealer, General Purpose Epoxy Resin, and Sculpwood Epoxy Paste. Paste, not the Sculpwood Putty.
First, I would sand off any paint. Technically, you would not need to do this, but since you are going to want to paint when you are done, I would go ahead and sand off the paint first. To protect the brick column and patio, I would put plastic sheeting on the ground, and wrapped around the column. Keep in mind that some of the S-1 might still drip on to the top of column, and possibly drip down onto the brick. You might put absorbent material on the top, under the plastic, to minimize any dripping down the face of the brick.
Next I would drill holes, about 3/16″, angled down, on both sides. Maybe every 2–4 inches, half to three quarters through. This will allow the S-1 Sealer, and the General Purpose (GP) Resin to get to much or all of the internal cavities. Check what comes out of the drill holes for moisture. If it feels damp, or you can squeeze water out of the tailings, you will need to dry the beam out before applying products.
Once dry, you can inject S-1 Sealer into the holes. If possible, you can catch what comes out, and recycle it into the beam. Plastic sheeting, stapled to the bottom of the sides, and angled, can be used to capture and funnel S-1 to a catch bucket, and re-used. Once the beam starts returning all or most of the product introduced, you can stop putting more in, and let the beam cure for 1–2 weeks.
After the S-1 cures, I would use the Sculpwood Paste to close any cracks or insect holes, leaving the drill holes open. This should keep any of the GP Resin from dripping out. This should take about 2–4 hours to harden enough to start with the GP Resin.
Once you get to using the GP Resin, I would start with the lowest holes, filling and topping them off as necessary. Let this cure, then move to the next row up, and repeat. While this will take a lot of time, waiting for each level to cure, it is the best way to ensure that maximum strength has been reached.
After you are done filling all cavities, you can sand, prime with S-1 Sealer, and paint. My best guess as far as quantities is 1-2 gallons of the S-1 Sealer, 1 gallon of GP Resin, and 1 quart of the Sculpwood Paste. Please let us know if you have further questions.
Doc