Subject: RV subfloor rot
Date: Tuesday, March 9, 2021
Howdy,
The photo below shows some rot that occurred in the back hatch of my Airstream from an undetected water heater leak.
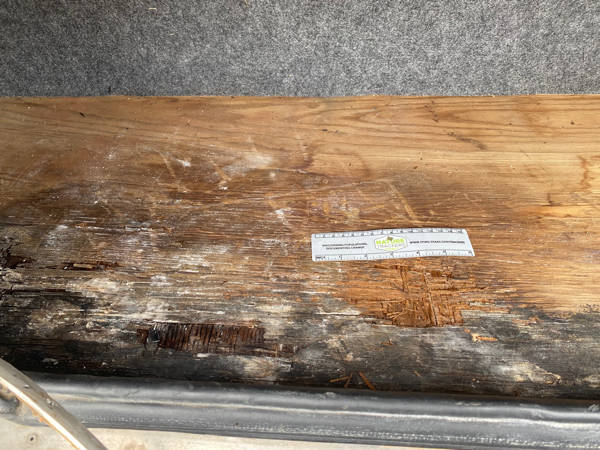
Please tell me which products I need to buy from you and how to use them. The black in the picture is some kind of moisturizer barrier that was painted on at the factory.
The subfloor will be covered with a layer of vinyl and a layer of steel diamond flooring. So the patch job doesn’t have to be pretty. I just want to strengthen the floor and prevent further rot.
Thanks,
Deb
Deb,
For this repair, you would want to use the S-1™ Sealer, and the General Purpose Epoxy™ Resin (GP Resin). The GP Resin comes in different temperature formulas, so you want to get the one that is suitable for the temperatures that you will be applying it in.
To make sure that the products get everywhere they need to go, you should drill small holes, maybe 3/16″ (4.5 mm) making sure that you only go in 3/4 of the way. You don’t want to go all the way through. Drill holes every 2–3 inches, staggered across the bad area, except for the areas where several layers have already rotted away. Only drill where the top layer is intact.
Brush S-1™ Sealer on the surface, letting it run into the holes and areas of missing wood. S-1™ is quite liquid, so it will tend to run and drip, likely getting all the way through, or dripping off the edge. So whatever is under the plywood will almost certainly get S-1™ on it. In most cases, this will do no harm, merely coating whatever is there with epoxy. If there is white styrofoam insulation underneath, the solvents in the S-1™ will dissolve the foam. More foam could be installed, if the area is accessible.
Speaking of solvents, the fumes will likely get noxious. Either a organic vapors respirator, or 1–2 fans, set to blow the fumes out, and supply fresh air, will be necessary.
You want to let the plywood absorb all the S-1™ it wants. If the damage is only what is shown, then the smallest size, 2 pints, should be plenty. If there is more damage, a larger size of S-1™ might be needed.
Once the S-1™ has had 4–8 days to dry, then the GP Resin can be applied. Pour a small amount on top, then use a wide bladed putty knife to spread it around, letting it settle into any cracks, drill holes, or low spots. With a wide enough blade, you should be able to scrape it flush over any areas where the top layers have been removed.
This product could also drip through or off the edge. So to avoid waste, I would put on smaller amounts in any area that is suspect, and see if drill holes, or low spots remain filled. Some should run under the interior layers, so you do want it to spread around, so it will glue down any splinters, and loose layers. You just don’t want it all pouring out of the repair, and going to waste. Add more as necessary to bring the resin up flush with the original height of the plywood. From the image, I would guess that the smallest 1.5 pint unit of GP Resin should get the job done.
This will take 1–2 days to fully harden. At which point you can continue with the repair, putting down any material or coating you desired.
Doc