Home > Customer Projects > Half Round Deck

Subject: Half Round Deck
Date: September 3, 2019
Note: all images can be seen un-cropped in larger versions by clicking on them.
Home > Customer Projects > Half Round Deck
Date: September 3, 2019
Note: all images can be seen un-cropped in larger versions by clicking on them.
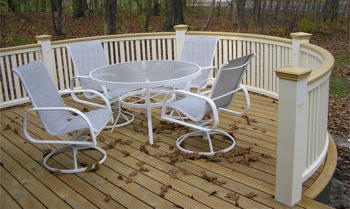
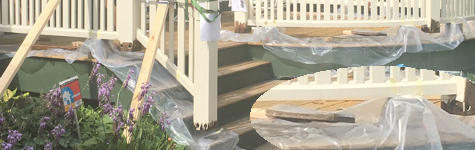
My deck success! I will be using waterproof trim borders around the pole bases so nothing will show later.
I built this maybe 15 years ago. All curved pieces are six individual boards glued together. So labor intensive. Where I am routing, each board was made from three boards glued together and then put in the jig to dry curved. The railing is doweled and glued into the posts. I had never built anything before so why not start out with a half round deck!

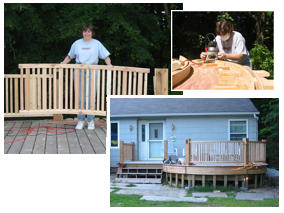
 The 6x6 cedar posts sat right on top of the cedar baords and I sealed no end grains. Sad face..... friends came to help lift it all up at once since it is all doweled together.
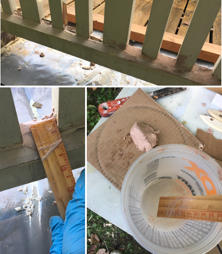
 A control stick goes in along side to see what it is doing. Steve suggested putting plastic in the pan. We did that. We raised the plastic that helped raise the level and really coat the insides and lag bolt holes (four per pole). I let it soak for two hours and then dipped them again the following day. (Steve: polyethylene plastic of sufficient thickness as to not tear, and be slipped under, and gathered around a rotted post, and used as a temporary form which has lower waste than a pan. Additionally, a pan may not be able to be slipped under most posts, while a plastic sheet sometimes can.)
I also saturated the floor boards. I didn’t want to be replacing any boards. I wanted all the same age look to the entire deck.
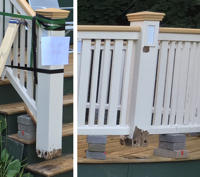
 Look a couple of pictures ahead to see how I constructed the rails. The spacer between the verticals I put an angled taper on and it was not a very deep board. So it looks onset more here. Again, I sealed no end grain, the spacers are rotting because of the caulk not sealing it. And paint keeps popping off the bottom of the rails because it would get wet and stay wet.
I used a detail car wash brush that looks like it has a cotton ball in the end. I saturated all the areas three times. This should seal it up nice!
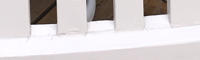 The rail system. Note the spacers between the verticals I put points on them so water would run off.
 Plastic is in place while I
 dabbed
the bottoms of the rails.
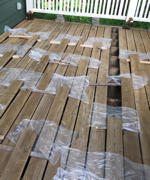 I lifted all the floor boards and sealed all the end grain three times, being careful not to get epoxy on the top of the boards. All I can say is how grateful I am for gel knee pads!
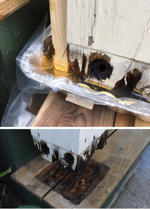
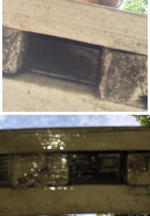
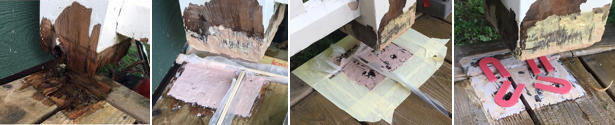
This board in the center has totally rotted end grain. See following photos where I completely saved it!
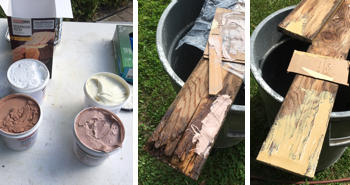
A shot of my work bench.
Starting to work on the long board.
I ended up with three boards like this... and Done!!
This was the worst pole and flooring in a dark corner that gets no sunshine. Look carefully at the floor boards. I used an air compressor and air nozzle to blow all the bad wood away before I started.
Wax paper, paint sticks and rulers. This turned out perfectly. It should last for years! (Steve: wax paper is fine for non-solvent epoxies like the GP Resin, or Sculpwood products. Polyethylene plastic can be used instead, and is fine for the solvent-added epoxies like the S-1 Sealer.)
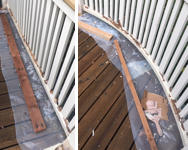
I put tape around floor boards while filling the floor boards.
Now I am also using plastic spacers from the glass industry to always have an air gap.
Friends return to help me lower it back down. Root beer floats for everyone!!
Now I have to take the air nozzle and blow the paint off the bottom of the rails and seal up the spacers and the boards were the paint keeps peeling.
Thanks for a great product. My deck is saved!!!
I knew these rails would be a lot of work too! When I blow it with an air nozzle and the paint lifts, that is my clue the wood is wet below! Here is the worst areas.
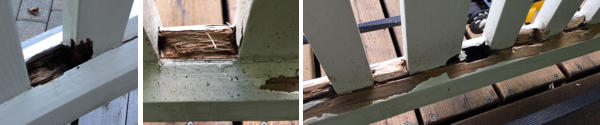
 This needs to be done one side at a time because of the way I was doing the S-1 product. Now I’m filling the paint that popped off. I use a carbide scraper after to really make it smooth. This afternoon, I hope, I will recreate the peaks now that both sides are filled. This paint always popped because I didn’t seal the undersides of the rails.
Here I am filling the points. I pre-filled the points with the paste just enough to fill the uneven wood, then I put in the putty. I could only work so many at a time. I had to go back and forth trying to get the peaks right. I would overfill them, then go back and work to get them right. So much work!
I dipped a ruler in paint thinner to help smooth out the putty. I thought it would save sanding. I didn’t know at the time how easy it sanded.
After I sanded them, and put the prime coat on, I did do some caulk work to really smooth out the edges and fill tiny holes.
-almost done! Just the green to repaint and nail the base shoes on.
DONE!

Contact us by phone 206-364-2155 or e-mail (send us your pictures) at drrot@rotdoctor.com and we will gladly answer questions about our products or how to apply them. With 20+ years of experience and many more in the boating and construction industries, not much surprises us. We are here to help our customers solve their issues. Let us help you to not have any surprises in your repair project.
Our business hours are 6:30 AM to 5:30 PM Pacific Time, Monday–Friday.
Tech support is available over weekends and holidays 8:30 AM to 5:30 PM Pacific Time.
The Rot Doctor, Inc.
P.O. Box 30612, Seattle, WA 98113
Voice: 206.364.2155
Fax: 206.364.4744
E-mail: drrot@rotdoctor.com
The Rot Doctor, Inc. ©1997–2021. All rights reserved.