Home > Customer Projects > Sun Deck Construction

Subject: Sun Deck Construction
Date: June - August 2005
Note: all images can be seen in larger versions by clicking on them.
Home > Customer Projects > Sun Deck Construction
Date: June - August 2005
Note: all images can be seen in larger versions by clicking on them.
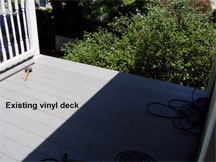
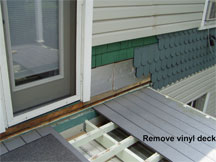
Existing vinyl decking is removed.
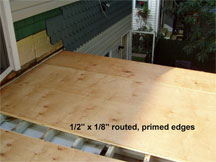
Prepare 3/4″ plywood by routing a 1″ wide x 1/8″ deep groove at all butt joint locations.
Match mark all plywood pieces.
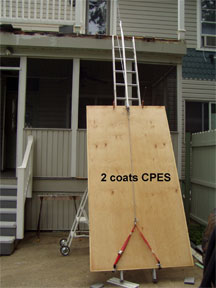
Seal all surfaces, except edges to be trimmed, with 2 coats of CPES*.
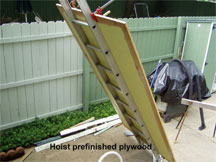
Set plywood in place.
Nail plywood in place with 2 1/2″ Stainless Steel ring shanked nails. Drill partial pilot hole and countersink before inserting nail.
Sink nails below surface. Seal with CPES* by dipping putty knife in CPES* and touching corner to nail head.

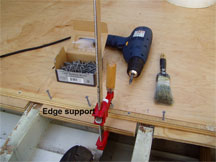
Attach 3″ to 4″ wide plywood edge supports between joists with adhesive and screws in groove.
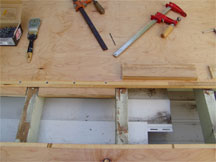
Install adjacent plywood panel with adhesive and screws in groove.
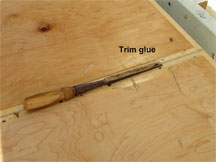
Trim adhesive after sufficient hardening. Seal nail and screw heads with CPES*.
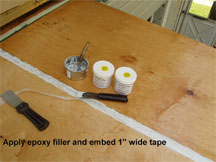
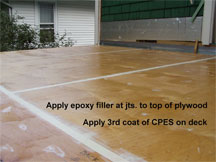
Apply 1st coat of “Fill It” epoxy* to groove at joint and embed 1″ wide poly tape. Let it set up.
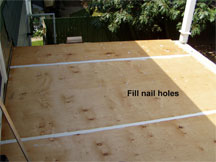
Apply 2nd coat of “Fill It”* with wide blade knife to top of plywood surface. Let it set up. Use left over epoxy to fill nail holes.
Trim and sand epoxy smooth if necessary.
Mark and trim plywood at outside edges leaving 3/16″ overhang.
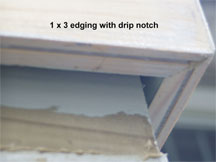
Prepare 1 x 3 wood edge caps by routing 1/2″ radius at top edge and 1/8″ drip notch on bottom.
Treat all Surfaces with 2 coats of CPES*. Treat groove with 1 coat Elaststuff 120. Paint or coat back side of edging leaving top 3/4″ uncoated for adhesive at plywood edge.
Install edge trim with adhesive and SS nails. Trim adhesive. Fill over nail heads.
Apply 3rd coat of CPES* to all exposed surfaces.
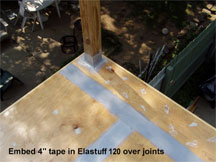
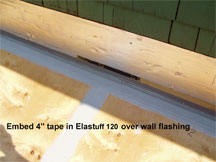
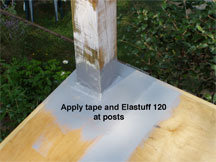
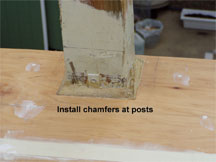
Set 4″ wide poly tape in Elaststuff 120 at joints, post chamfers and flashings.
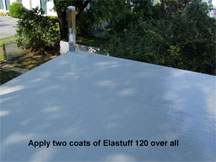
Apply 2 coats of Elaststuff 120 on all exposed surfaces.
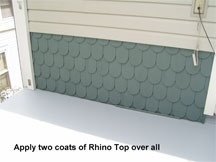
Apply 2 coats of Rhino Top on all exposed surfaces.
Apply 1 additional coat of Rhino Top to traffic area.
I had vinyl shingles extend down over the wall flashing. I just slipped the bottom edge trim (J-Channel) up behind the shingles without fasteners. The trim can be removed for cleaning.
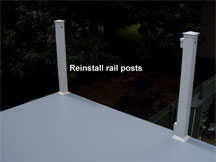
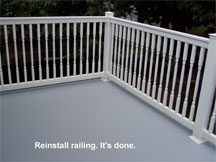
Install all trims and railing.
* These products are unavailable, we are selling comparable products that will perform these same tasks. Feel free to contact us if you need assistance with which products to use.
Contact us by phone 206-364-2155 or e-mail (send us your pictures) at drrot@rotdoctor.com and we will gladly answer questions about our products or how to apply them. With 20+ years of experience and many more in the boating and construction industries, not much surprises us. We are here to help our customers solve their issues. Let us help you to not have any surprises in your repair project.
Our business hours are 6:30 AM to 5:30 PM Pacific Time, Monday–Friday.
Tech support is available over weekends and holidays 8:30 AM to 5:30 PM Pacific Time.
The Rot Doctor, Inc.
P.O. Box 30612, Seattle, WA 98113
Voice: 206.364.2155
Fax: 206.364.4744
E-mail: drrot@rotdoctor.com
The Rot Doctor, Inc. ©1997–2021. All rights reserved.