Home > Customer Projects > Arthroscopic Transomectomy: 1972 Sea Sprite

Subject: Arthroscopic Transomectomy: Transom Repair on a 1972 Sea Sprite
Note: Most images can be seen in a larger version by clicking on them.
Home > Customer Projects > Arthroscopic Transomectomy: 1972 Sea Sprite
Note: Most images can be seen in a larger version by clicking on them.
This story ends happily and is presented here because it was an interesting experience which might be useful to others.
My boat: 1972 Sea Sprite - owned by me since about 1985. Garage kept by myself and previous owner. I discovered transom was rotten last year. With the age of the boat (and motor) I didn’t feel it was worth the "take the boat apart and build a new transom" solution.
I had come across a reference to THE ROT DOCTOR™, a site which sells epoxy based products for working with and preventing wood rot in marine environments. I put together a description of my plan so I could ask for advice. I’ve included a copy of my "original plan", so you can see how the plan changed on me.
The new plan…

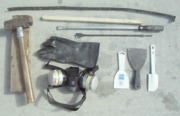
I cut open the top of the transom between the black lines. As I dug down approaching the blue line, the wood in the center got softer and softer. I started out with a large drill bit, long chisel and a shop vacuum. As I went deeper, I made a "chisel" out of 1″ heavy strap metal with a hooked end for pulling out the larger pieces. A very long spade bit on a drill actually turned out to the most useful tool as it would tear up the wood, but bounce off the fiberglass. I extended my shop vac with a 1 inch outside diameter hose, since the normal tubes wouldn’t fit all the way down.
The wood at the bottom was the softest, pointing to the bilge drain as the real cause of the rot problem. When all was done, I found a puddle of epoxy in the bottom of the bilge, meaning there was a hole from the transom area to the bilge(which should now be full of epoxy).
Once I had cleaned out the hole, I mixed up 2/3’s of the CPES* from Rot Doctor and soaked all the wood thoroughly. This must be done in a well ventilated area, WITH a good organic compound filtering mask. It took days to finish curing (and for the smell to leave my garage).
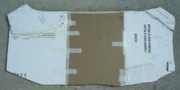
I thought long and hard how I was going to fill this hole with wood and still maintain the best strength. The original plan wasn’t going to work with the new shape and I didn’t like that kind of joint in the middle. I cut pieces of cardboard to fit one side of the hole - pushing it into the edge, then trimming where the edges were bent back until I had a good fit. Then added cardboard piece by piece, working toward the center from both sides. Where they overlapped, I marked both sides as deep as I could. When taped together, I had a good form for the interior of the transom.
Marine plywood isn’t commonly available here in central Illinois, so I settled on a high quality exterior 1/2 inch plywood(the original transom was exactly 1 inch. I cut two pieces using my cardboard outline.
How to get it into the hole?
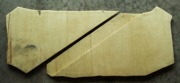
I cut each piece in half at an angle less than that of the top corner(so it would slide in and "jam" tight). I staggered the cut between the two layers about 4 inches. Then I used Rot Doctor’s epoxy wood glue to glue each of the pairs together - coated both pieces, then laid them flat on the floor with bricks on the top. When dry, I coated both pieces with CPES* and used the rest of the CPES* to coat the edges inside the transom a second time.
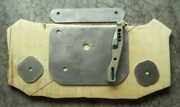
As some extra protection and because the fiberglass under the engine mounts was damaged by lack of support by the rotten wood, I had a machine shop cut out some 3/16th aluminum plate to put outside and inside.
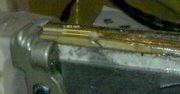
If you look close, you can see I got the “measure twice and drill once” paradigm backwards…

The plan now, was to cover everything with epoxy, slide one piece in, then the other - then drill and install the engine mount bolts and clamp along the top. As there was no stopping in the middle, I waited for a Saturday morning - with everything ready and some help on hand. I mixed a 2 quart kit of L&L*, added wood flour to a cookie dough consistency and pushed most all of it down into the hole. I then took a piece of 3/4x3/4 wood and worked the epoxy into all the rough edges of old transom and smeared it on the fiberglass sides. Nearly ready for the first piece, I used a serrated putty knife to coat the new transom piece on all sides. I then pushed it in and wedged it over to the side as tightly as it would go with a crowbar.
I mixed another batch of L&L*, this time without wood flour. I coated the second piece thoroughly and poured a couple of cups into the hole and shoved the other piece in as far as it would go. A five pound sledge and a block of wood was used to drive the piece in tight. It was a good fit as there was only about 1/8th of an inch high on one side. I then pried the fiberglass out from the new transom wood and poured more epoxy down the sides until it wouldn’t run in anymore.
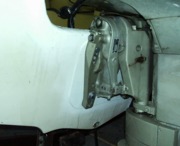
I drilled out the original holes bolt holes through the new wood, coated one side of the metal piece and bolted it all together, including the engine mounts, aluminum and washers. This as expected resulted in an "epoxy flood" as excess epoxy was squeezed out over the top edge. When it stopped running, I scraped it off, then used some Epoxy Cleanup Solvent* and an old brush to clean off most of the epoxy. I then clamped the top edges (wax paper allowed me to remove the clamps later).
Nothing to do at this point, but to wait a couple of days.
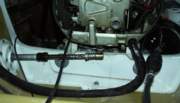
I pulled off the clamps, cleaned up the remaining slop-over epoxy. I mixed up some more L&L*, added almost an equal amount of wood flour - to end up with a thick paste. I worked that into the top of the transom to form a rounded surface. Despite thickening the epoxy, it still wanted to crawl so I took my trusty gray tape and laid strips inside to outside, over the epoxy to hold it while it hardened. As odd as it sounds, it actually created a fairly nice shape - albeit with some tape marks that need to be sanded out. After a couple of days, I power sanded this smooth, cleaned it all up - taped the edges and put a good epoxy paint over the transom edge and the whole transom area. Another day for the paint to dry and I remounted the engine. A few days later, off for a test drive.


It isn’t showroom pretty, but it IS functional. I spent about 2 full days removing wood. It took another 2 days to apply CPES*, make the cardboard form, cut, glue and coat the wood. Another day’s worth of work to finish and paint the transom. These 5 days were spread out over about two months of "spare time", both because that was when I had the time, and because it took some time for CPES* and the epoxies to dry. I guess it can stay in my garage.
mgg
* These products are unavailable, we are selling comparable products that will perform these same tasks. Feel free to contact us if you need assistance with which products to use.
Contact us by phone 206-364-2155 or e-mail (send us your pictures) at drrot@rotdoctor.com and we will gladly answer questions about our products or how to apply them. With 20+ years of experience and many more in the boating and construction industries, not much surprises us. We are here to help our customers solve their issues. Let us help you to not have any surprises in your repair project.
Our business hours are 6:30 AM to 5:30 PM Pacific Time, Monday–Friday.
Tech support is available over weekends and holidays 8:30 AM to 5:30 PM Pacific Time.
The Rot Doctor, Inc.
P.O. Box 30612, Seattle, WA 98113
Voice: 206.364.2155
Fax: 206.364.4744
E-mail: drrot@rotdoctor.com
The Rot Doctor, Inc. ©1997–2021. All rights reserved.