Home > Customer Projects > Fixing Puff: Structural Repairs Using Epoxies

Fixing Puff: Structural Repairs Using Epoxies
By David Harding
Home > Customer Projects > Fixing Puff: Structural Repairs Using Epoxies
By David Harding
A boat owner shares some valuable lessons on wooden boat repair.
EDITORIAL NOTE: When Dave was ready to begin repairs on his boat, he contacted us with a few questions about the use of our materials. He made his repairs and documented the process on an MSN website. With Dave’s permission, we have taken that material and formatted it into the article that follows.
We are giving it to you as Dave gave it to us, and as he reported it on the MSN website. Dave’s words give a good sense of the process and the decisions he made. There is some valuable information here. We have included also Dave’s list of recommended books that have to do with boats and boating.
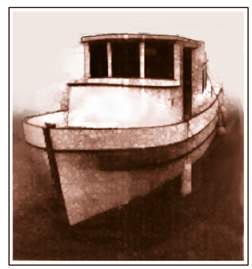
So here it is, starting with a rendering of the boat and one of Dave’s first posts to us:
Hi Doc,
Yes, I have covered moorage for Puff. Puff began life in 1959 as a commercial Gill Netter. She was reportedly taken to San Francisco in the early eighties and converted into a pleasure tug. At that time, she was fitted with a new deck, house and engine. The previous owner of 10 years apparently had some misfortune and was forced to leave Puff at anchor in the San Juan Islands for some time.
I purchased the boat in November, 1999. This is my first boat. I had the boat surveyed and I was told that Puff had soft wood in the bulwarks. I was so full of boat lust I was not really sure at the time what soft wood would entail. Puff was really soggy when I got her. She had mold on the deck over the bunk, and the diesel stove was not working to dry her out. Puff would bleed water as a response to thrusting a knife into her bulwarks. She was so wet, she might very well have been pulled from the bottom. I left an electric heater running inside Puff most of the year. Slowly she began to dry out. Later I had the diesel stove fixed, and that dried her out in a hurry!
At first the bulwarks were just soft, and wet. During the next nine months Puff began to dry out and the soft wood began to turn into dust. The bulwarks were so bad in fact, that I broke off a section. (See photo in follow-up email ). Before I began with the CPES* (Clear Penetrating Epoxy Sealer), the bulwarks were bone dry at the bow. The stern bulwarks still had dampness when I began treatment, and she still drank up 4 gallons of CPES*. I am now covering the stern with a tarp this winter. I didn’t realize she was getting that damp under cover.
The nice things about work boats is that you can drill big holes in the timbers without really damaging them. Puff was built in B.C. Canada, from Douglas Fir and Cedar. Puff’s bulwarks are constructed from cedar 4x4s and are stacked and sawn.
I would guess that I drilled 40 holes at the stern, and later drilled 40 more at the bow. The holes I drilled at the bow smelled of fresh cedar, and left nice clean cedar shavings. At the stern the shavings were damp, brown and continually clogged my drill bit.
The stern has took 4 gallons of CPES*, 1/2 gallon at a time, with a nightly visit. Puff told me she could take no more, when I showed up to inspect her and found CPES* still lingering in the bottom of most of the holes. This whole processes was really mostly waiting for the CPES* to cure. Because of this I decided to perform the same procedure to the bow. The bow took 1-1/2 gallons of CPES* with the very first visit.
Here are the steps I took:
Removed all paint from the deck side of the bulwarks with a propane torch (a two day job for me and a “fireman” wife)
Chiseled out the bad wood from obviously rotted areas
Drilled 3/4 inch holes above any areas that were obviously bad
Continued drilling holes while sounding the bulwarks with a hammer
Drilled additional holes at mid points between existing holes for good measure
Filled holes with CPES*
Let dry for 3 weeks and filled with L&L*
The removal of paint greatly aided assessing the situation. I also believe that it has aided in drying the bulwarks and sped up the drying of CPES*.
(Note: After removing the layers of paint from the bulwarks, I theorized that the hundreds of cracks in the years-old paint had let water enter the wood preventing it from leaving. Here in Seattle we get so much rain, wood just won’t dry out properly in the few short weeks that the rain stops.)
I have also sent you several pictures that illustrate my saga.
So far so good. The process is a lot like having a tooth crown made, which is to say things must get ugly before they can get better. For both tooth rot and wood rot that is.
… and yes the boat will be under cover while I own her
FROM THE WEBSITE…
Greetings
This web site was developed to share what I have done to my own boat. This site is not intended to serve as a general guide. All boats have their own unique set of characteristics, and therefore such factors should be taken into consideration when developing a unique set of plans to serve specific renovation needs. This site shares many of the more valuable lessons I have learned myself during the course of performing my own work on my first wooden boat. This information is being shared in hopes that where applicable, readers might be able to leverage some of what I have learned myself so that they might become more successful at renovating their own boats.
INFORMATION PROVIDED HERE SHOULD NOT BE INTERPRETED AS A GUARANTEE OF ACCURACY before during or after publication. Information provided here is often written days or weeks after each project, and so, does not include every single detail that had actually occurred. THIS WEB SITE IS FOR INFORMATIONAL PURPOSES ONLY. NO WARRANTIES, EXPRESSED OR IMPLIED. All rights reserved. No part of this web site may be reproduced without written permission from the copyright holder. Copyright David Harding, 2001
The names of actual companies and products mentioned herein may be the trademarks of their respective owners.
Enjoy, and best of luck to you.
Dave
David Harding can be contacted via email at: _harding@msn.com
Note: images can be seen in larger versions by clicking on them.
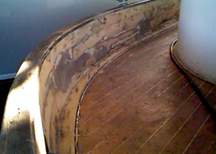
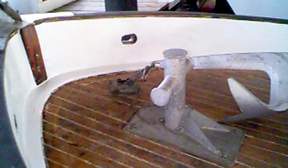
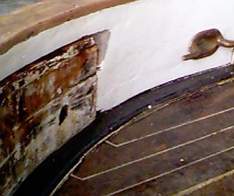
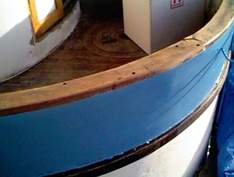
Bow Photo 1
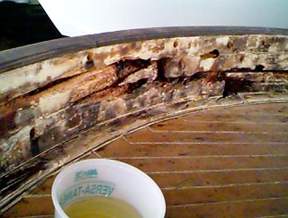
(See Bow Photo 1) Puff is a diesel-powered boat, so I began by removing all of the layers of paint with an inexpensive propane torch and two canisters of gas that I purchased from Home Depot. Removal of paint to bare wood took about two hours. I used a 3M Respirator to tackle the smoke, an automotive gasket scraper to remove the smoking paint and a one-gallon shop vacuum to handle the debris. I had a helper standing at the ready with a hose to insure that the boat did not catch fire and burn to the water line. I had a bucket of water within close reach that I could have used myself. I followed the removal of paint with the removal of all soft wood from the bulwark, which was easy work for my automotive gasket scraper. I scraped and scraped until I was removing wood that left behind a nice cedar shaving. I was careful to suck up the debris using the shop vacuum to prevent the rot spores from traveling elsewhere. Included in this photo is a 1-gallon bowl containing CPES* with 1/2 gallon already applied to this area of the bulwark.
I purchased the CPES* from www.rotdoctor.com. Included on that web site are suggested methods for tackling rot problems on both homes and boats. I found the information pertaining to the repair of log homes to be applicable to the design of my boat and so decided to use the steps illustrated on that web site as a general guide. After the removal of paint on both the starboard and port bulwarks I sounded the bulwarks with a hammer and where the wood sounded questionable I drilled a 3/4 inch hole, which I would later use to apply CPES* deeply into the wood. The 3/4 inch holes acted like little reservoirs for CPES*, allowing the surrounding wood to thoroughly absorb that chemical. Deep penetration into the wood was required to restore strength and encapsulate the rot with epoxy so it would not continue to spread.
Bow Photo 2
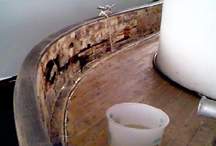
(See Bow Photo 2) I applied roughly 5 gallons of CPES* to the bow. Roughly equivalent volumes of CPES* (2-1/2 gallons) were applied to the port and starboard bulwarks. Typically I applied a quart of CPES* to each side, then waited 24 to 48 hours for subsequent applications. I was able to apply substantially more CPES* during the initial application. After I was sure that the wood had been completely saturated I allowed the CPES* to cure for three weeks.
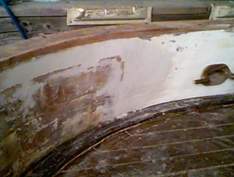
Bow Photo 3
(See Bow Photo 3) After such time I found that the bulwarks had regained considerable strength. Even where the wood had been damaged by rot the wood was difficult to stick a knife into. Here you can see the application of CPES* using a turkey-baster tool, which worked quite nicely.
Bow Photo 4
(See Bow Photo 4) After the CPES* had completely cured I followed the treatment with Layup and Laminating Epoxy Resin* (L&L*) using a sawdust mixture. The Layup and Laminating Resin* was quite difficult to sand therefore during application I used great care to make sure that any needed sanding would be minimal. I cleaned up surrounding areas where L&L* had come in contact using Epoxy Clean-up Solvent* also purchased from www.rotdoctor.com After applying L&L*, I inspected the repair the next day to remove any L&L* that had wept onto surrounding wood. Due to cool evening temperatures I was able to remove small amounts of L&L* the next morning using a pocket or putty knife. Prompt removal of L&L* from unwanted areas was key to assuring that the removal of completely cured L&L* could be avoided entirely.
Bow Photo 5
(See Bow Photo 5) Treatment continued by filling each hole I drilled with L&L* Resin. The viscosity of L&L* is roughly equivalent to honey. I added fine sawdust with L&L* to produce a consistency roughly equivalent to bread dough when it was necessary to trowel the mixture into a void. Holes that I intentionally drilled were filled with straight L&L* to assure that the resin would deeply penetrate the hole removing all available air space. After allowing the L&L* to cure for 24 hours, I then filled the remaining dimples with a thin layer of Fill-It Epoxy Filler*, purchased from www.rotdoctor.com. This resulted in a nice surface that I could easily sand. Using a Porter Cable 97355 I easily sanded down the entire bulwark using 60 & 100 grit.
Bow Photo 6
(See Bow Photo 6) I filled small imperfections in the bulwark with Fill-It Epoxy Filler* then waited twenty-four hours for the filler to cure before sanding it with 120 grit. I continued this process two or three times to assure that the surface would appear smooth after it had been painted. I really took my time to make sure that the shape of the bulwark was preserved, since these last few hours of work would be the ones that would really unleash the beauty in this old boat. After I had sanded and filled all imperfections in the bulwark to my stringent standards, I applied two last coats of CPES* to the bare wood.
Bow Photo 7
(See Bow Photo 7) Here you can see the preparation to painting. I have applied two coats of CPES* to the bare wood. I applied CPES* to assure that the inside of the bulwark would be virtually watertight. Two coats of CPES* followed by the application of paint might greatly reduce the woods ability to breathe, however it will virtually guarantee that the wood remains dry. In the highly unlikely event that any rot spores survived the onslaught of chemistry that I unleashed upon them, the absence of water will make it difficult for any such spores to do any significant damage to the treated wood.
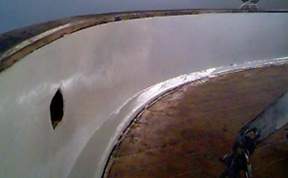
Bow Photo 8
(See Bow Photo 8) Twenty-four hours after the application of CPES* I painted the bow with Interlux Premium Yacht Enamel (High Gloss White). Prior to the application of paint, I masked off the teak cap strip, and cedar deck to minimize any needed clean-up. The CPES* was still slightly tacky when I painted on the first coat. With all that, I managed to get a few runs in the paint, which I will sand out later. After the paint had been applied, I waited about one hour then removed the masking tape to assure that its removal would be quick and easy.

Bow Photo 9
(See Bow Photo 9) Here is a closer photo of the port bulwark. Since the majority of the project duration had been spent waiting for the chemistry to do its thing, doing a single side would probably have taken just as long to do as both sides. Therefore, to play it safe I used the same technique on both port and starboard bulwarks in spite of the fact that the port bulwark had nothing visibly wrong with it.
I have never attempted such a project before this one. I am glad I decided to repair the problem myself. A marine carpenter estimated that it would cost over seven thousand dollars just to replace the wood in the bow bulwark, and as one passerby at my marina so eloquently put it, the wood I have in the bulwark now is as good or better than any the marine carpenter might have been able to locate today.
Bow Photo 10
(See Bow Photo 10) Here is a closer photo of the starboard bulwark. I can hardly believe this is the same bulwark shown in Bow Photo 1. The repair turned out great. The hardest part about this repair was to be patient, and to not proceed to the next step until the chemistry had the opportunity to do its thing. I also used as much CPES* as the wood could absorb. It is important to note that the wood was completely dry before I applied CPES*. The bulwarks were so wet when I purchased this boat that it took a full six months under cover before they dried out enough for me to begin the repair. I suspect the time could have been greatly reduced if I had removed the paint sooner. I suspect that this would have made the wood breathe better, thereby allowing the wood to dry out faster.
Note: images can be seen in larger versions by clicking on them.
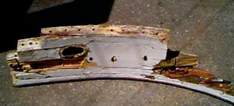
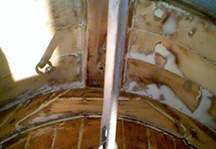
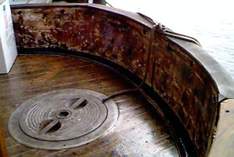
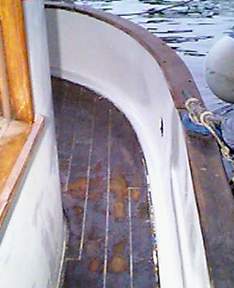
Stern Photo 1
(See Stern Photo 1) This is what happens when you tie your boat to the pier really tight, and a big wave comes. Of course having a little soft wood helped too. (Note that this bulwark is upside down. The section is laying on the teak cap. All other pictures of this section illustrate the bulwark with the teak facing up.)
Stern Photo 2
(See Stern Photo 2) Just as I had done at the bow, I took a torch and burnt off all paint so I could see what I was dealing with. For safety, I had a bucket and hose near by. I also had a helper man the hose, and stay on the look out. I would not have tried this if I had gasoline or propane on board.
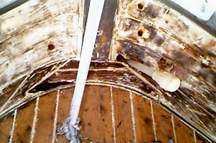
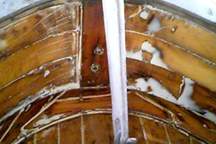
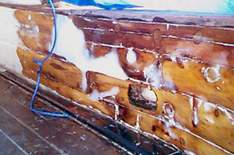
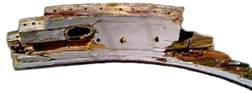
Stern Photo 3
(See Stern Photo 3) This section was soaked in CPES*, and filled with Layup and Laminating Epoxy Resin*. The section was attached using 8 inch galvanized lag screws, then epoxied on both ends with Layup and Laminating Resin*. A thin coat of Fill-It Epoxy Filler* hid the seam.
Stern Photo 4
(See Stern Photo 4) Layup and Laminating Resin* was poured in both ends of the broken bulwark to form a tight bond between the broken bulwark and the bulwark attached to the boat. Vacant spaces were then filled with Fill-It Epoxy Filler*.
Stern Photo 5
(See Stern Photo 5) Just as had been done at the bow, I applied two coats of CPES one day before applying the white enamel. The CPES* was applied to make the bulwark more water resistant. I am amazed at how wet bulwarks can get. They take the weather from both sides. Here in Seattle, that is rain on both sides. (Note: This is the starboard bulwark)
Stern Photo 6
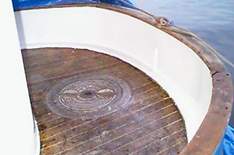
Stern Photo 6 shows the same view as Photo 2 after repair, epoxy treatment, and paint (Interlux White Enamel).
(See Stern Photos 7 & 8 ) First, application of Fill-It Filler*, sanded smooth, then paint. After one coat of paint, I had the paint mixed at home depot via their computer system, not the best “boat” paint but hey it did match.

Stern Photo 7
Stern Photo 8
(See Stern Photo 9) A good shot of the section that I broke off, and repaired. This section is also illustrated in Stern Photo 1 which can be seen again below. (Note: this photo is of the port bulwark)
(See Stern Photo 10) This is actually a close up of the section that I broke off after the repair was complete. I had to take a look at the picture a few times myself. From this picture you would never know that this section had broken off. (See Stern Photo 1).
Stern Photo 9
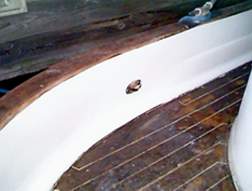
Stern Photo 10
After spending considerable time using palm sanders a fellow boat owner loaned me his Porter-Cable. After just a few minutes of use I was hooked. I purchased the Porter Cable 97355 Sander from www.amazon.com along with the hook and loop sandpaper. I had an older shop vac, that connected directly to the Porter Cable to really suck up the dust. The 97355 with optional shop vacuum leaves very little dust behind. It is noisier but much cleaner than a palm sander with dust bag. Most of the additional noise occurred due to the addition of a shop vac. I found that this sander removed material quickly, was kind of hard to hang on to at times, but that it saved me considerable time, compared to the palm sanders I used.
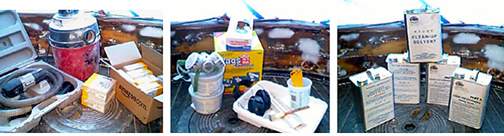
I purchased a 3M Respirator, Scott Rags in a box, paint brush, rubber gloves, hearing protection, disposable putty knifes, stirring sticks and rolling pans from Home Depot. I used the respirator and rubber gloves while applying all products purchased from www.rotdoctor.com. I used the hearing protection any time that power tools were used.
I purchased Clear Penetrating Epoxy Sealer (CPES*), Layup and Laminating Epoxy Resin* (L&L*), Epoxy Clean-up Solvent*, and Fill-It Epoxy Filler* from The Rot Doctor. The transaction was made via the web site found at www.rotdoctor.com
An Introduction to Nautical Relics
By James Seeley White
ISBN 0-89288-212-3
3-Stars
As the title suggests, this book is an introduction. The relics discussed in this book each had been salvaged from a shipwreck. The author himself salvaged several of the relics discussed in this book. Included are 54 pages of text and photos. Relics salvaged from shipwrecks are by definition authentic nautical items. Such information is of value to readers who may question the authenticity of a (common) nautical item. (i.e. port lights, port holes, cleats, a ships wheel, compasses and navigating lights). Many such items today are reproductions.
Recommended by Dave, 12/29/2000.
Boatowner’s Mechanical and Electrical Manual
By Nigel Calder
ISBN 0-07-009618-X
4-Stars
A valuable reference book, that illustrates how most mechanical and electrical things work on small craft. I use this book as a reference to understanding how mechanical and electrical systems should function. I found this book’s many illustrations interesting. The value of the many illustrations and how-to information provided will be obvious to any new boat owner. I recommend that every new boat owner add this book to their reference collection.
Recommended by Dave, 10/25/2000.
Brightwork: The Art of Finishing Wood
By Rebecca J. Wittman
ISBN 0-87742-984-7
3-Stars
This is a fine book of high quality. Included are many quality pictures of old boats, and high quality finishes. This book includes all the facts needed to understand the craft of varnishing old wood. This book helped me to understand the requirements of applying varnish. I believe that the book is a little too verbose for the subject matter. Although, the author does convey her love for the craft of varnishing wood. You will need to read most of the book to pick out the few nuggets that are needed to apply varnish properly. Read this book, and follow the best practices discussed and you will be well on your way to a beautiful finish.
Recommended by Dave, 10/25/2000.
Getting Started in Power Boating
By Bob Armstrong
ISBN 0-07-003095-2
4-Stars
I recommend this book to anyone with little or no experience with power boating but is considering purchasing a first boat. A boat is a significant investment in both time and money. Read this book before your first purchase and you will better your understanding of power boat handling capabilities before you spend a significant amount of money. I read this book while searching for my boat, and later found that the boat I purchased handled just as had been discussed in this book. I highly recommend this book for the beginner.
Recommended by Dave, 11/1/2000.
How to Live Aboard a Boat
By Janet Groene
ISBN 0-87851-217-9
3-Stars
I stumbled on this book at a used bookstore. Written in 1983, this book might be out of print, I am not really sure. Anyway, I found this book interesting. The author of this book was a liveaboard at the time of her writing. She writes of her own experiences and those of other liveaboards she has met over the course of many years. (1970ish–1983) This is not a book about living aboard at a marina, but rather about giving up everything to become a cruising liveaboard. The book includes advice on choosing and equipping a boat to live aboard, how-to earn a living while cruising the world, keeping warm, keeping cool, as well as advice on raising pets, and raising children while living aboard. I would give this book, more than 3-stars if it were written more recently. The content may very well be applicable today, but I am not really sure. It sounded fun!
Recommended by Dave, 2/1/2001.
Journeys Through the Inside Passage
By Joe Upton
ISBN 0-88240-506-3
4-Stars
For starters, traveling the inside passage to Alaska is something I have no experience doing however I plan to undertake such a voyage in the future. The author of this book tells of his own experiences and those of seafaring friends (fishermen), over the course of two decades, while traveling (and fishing) the inside passage to Alaska. Included is relevant information pertaining to history, culture, fishing boats and industry, which makes the book interesting from several perspectives. This is a book I found easy to read, educational and interesting. Included are roughly 170 pages of text, photos and charts.
Recommended by Dave, 12/29/2000.
Keep Your Marine Diesel Running
By Richard Thiel
ISBN 0-87742-266-4
3-Stars
86 pages of introductory material on Marine Diesels. The essential must-know information for any new owner of a marine diesel. Easy reading facts that you can apply yourself.
Recommended by Dave, 10/24/2000.
Slow Boat on Rum Row
By Fraser Miles
ISBN 1-55017-069-4
4-Stars
This memoir written by Fraser Miles tells of life during the great depression and working aboard a rumrunner during the prohibition. The book gives a first hand account of a way of life few people spoke of. “Don’t tell nobody nohow” was the creed among those who made their living smuggling liquor into the United Stated during the prohibition. The book appears to be based on detailed vessel logs and the author’s own diaries. Included are the names of vessels as well as the volume of liquor being transferred between boats. As the author put it, they might as well have been delivering milk for the trouble they ran up against during years of operation. I found this book to be an interesting and detailed account of rum running on the Pacific Coast, from B.C. to Mexico.
Recommended by Dave, 7/20/2001.
The Klutz Book of Knots
By John Cassidy
ISBN 0-932592-10-4
4-Stars
If you have never tied anything other than your shoes I highly recommend this book. The book illustrates basic knots that are essential for any new boat owner. There are many books on this subject. Many books cover the subject matter to a greater degree. However, don’t go out on the water without being able to tie the basic knots discussed in this book. The book comes complete with two lines so you and your family can make the learning experience interactive and educational. A good book for kids.
Recommended by Dave, 11/1/2000.
The Trawler Yacht Book
By George Buehler
ISBN 0-393-04709-1
4-Stars
A great book, written by a well known designer of wooden boats. More than 180 pages written by a real lover of wooden boats. The author does an excellent job of sharing his knowledge about various boat designs, and requirements of boats under various cruising conditions. The author’s writing style made the book enjoyable to read, and easy to understand. I recommend that everyone read this book, before purchasing their first boat. The book heavily suggests that wooden boats are a better alternative to other materials, given considerable argument to make the case. I read the book at least three times, and was the basis for my purchasing decision.
Recommended by Dave, 10/24/2000.
United States Power Squadron’s Boating Course
By Hearst Marine Books New York
ISBN 0-688-09126-1
5-Stars
For power or sail boaters, this book and video course are a must have for any new boaters. Don’t go out on the water without understanding the rules of the road. The skipper is legally responsible for the safety and well-being of all lives on board. I highly recommend that you and your family watch the video as many times as needed to understand the basics. The video is entertaining, and motivating. A helpful aid to educating yourself and your family. Follow up by reading the book. A helpful aid to boat safety and basic education. An absolute must for any new boater.
Recommended by Dave, 10/24/2000.
Voyaging Under Power
By Captain Robert P. Beebe
ISBN 0-07-158019-0
4-Stars
A very well written interesting book on the subject of crossing oceans in small power boats. The book documents the voyages of several small pleasure craft. Included are discussion of boat design, ships supplies and needed equipment. The book illustrates the work of several boat designers, that claim to have a better approach, leaving it to the reader to determine which of those designs is ideal for their travels. I recommend this book to anyone who currently owns a boat, and is interested in the capabilities of a well equipped, well stocked and well designed ocean-going trawler.
Recommended by Dave, 10/25/2000.
Wooden Boat Renovation
By Jim Trefethen
ISBN 0-07-065239-2
2-Stars
This book provides general information on all aspects of wooden boat repair. The book does a good job of providing general information on common boat renovation projects at the introductory level. The book did not provide me with any insight as to how to tackle my renovation requirements. The book discusses only the most obvious and basic renovation projects. The first 77 pages are dedicated to discussing types of tools and types of wood… basic and elementary discussion for any renovation project. I recommend reading this book before reading the books I have given 3, 4, or 5 Stars, otherwise I suspect you will be disappointed. This was one of the last books I read. There was some good information in it. However, most of the material I was reading had already been addressed in more detail in other books I have listed.
Recommended by Dave, 10/25/2000.
Go back to Wooden Boat Repair section.
* These products are unavailable, we are selling comparable products that will perform these same tasks. Feel free to contact us if you need assistance with which products to use.
Contact us by phone 206-364-2155 or e-mail (send us your pictures) at drrot@rotdoctor.com and we will gladly answer questions about our products or how to apply them. With 20+ years of experience and many more in the boating and construction industries, not much surprises us. We are here to help our customers solve their issues. Let us help you to not have any surprises in your repair project.
Our business hours are 6:30 AM to 5:30 PM Pacific Time, Monday–Friday.
Tech support is available over weekends and holidays 8:30 AM to 5:30 PM Pacific Time.
The Rot Doctor, Inc.
P.O. Box 30612, Seattle, WA 98113
Voice: 206.364.2155
Fax: 206.364.4744
E-mail: drrot@rotdoctor.com
The Rot Doctor, Inc. ©1997–2021. All rights reserved.