
Home > Customer Projects > Catalina Deck Repair

Subject: Catalina Deck Repair
Date: September, 2008
Note: All images can be seen in a larger version by clicking on them.
Note from Dr. Rot: A customer of ours used our products to make a repair on his sailboat, a Catalina 22. He was analytical and precise — his repair and his comments on the repair reflect that. His email to us concluded with this comment:
“I admit I’m a little paranoid when I step on that part of the deck, but then I look at it closely now and then where the hatch flange was showing the sag, and find it still holding up good and tight. Nothing but a good solid sound when tapping on the deck there too--lamination is holding up well also.”
We thank Tom for giving us permission to include his repair pictures and his very useful comments in our Customer Comments and Projects section.
Click on photos to see larger.
Part I: Deck Repair
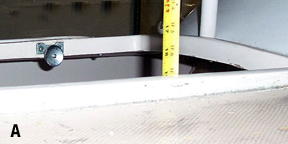
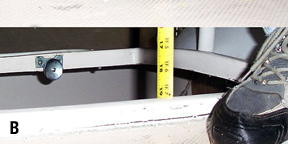
I found that I had the dreaded, but common problem of “soft deck”. Previously, when I had done some repairs to the hatch, I discovered that this was where water was getting into the plywood core causing soggy plywood and delamination. I found a fairly large area of about 2x2 feet that ‘thunked’ rather than ‘pinged’ when knocking with a hammer. The photos (Pics A and B) show how much the deck sagged when I stepped on it near the hatch - about 1/4 inch.
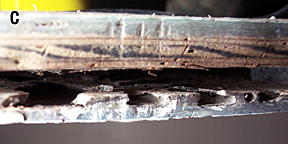
After prying off the hatch flange, I found the delamination. Although the plywood didn’t appear rotten, it was damp. The ceiling of the v-berth is on the bottom and deck on top. When I pried the fiberglass back, I could look fairly far back into the gap under the deck (Pic C). The question was what method to fix this? 1) Cut the deck off, fix the core and glue it back on. 2) Drill holes, dry out the core, and fill it with CPES* and resin? Easy choice - drill holes!
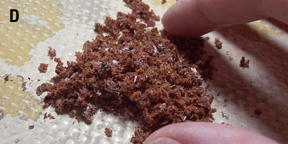
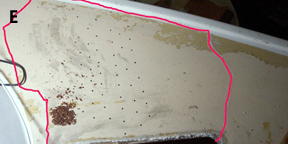
First I drilled a few holes to get a core sample. The plywood core came out damp, but not soaking wet (Pic D). This was good! It didn’t appear dark and rotten, so I set up a tarp tent over the deck and put in a heater after drilling maybe 100 holes (Pic E). I left the heater on for about 7 days, drilled a few more holes and found that the core was dry.
The area outlined in red (Pic E) is the area that seemed to have the problem from that tap test. Kind of scary drilling holes in the deck but once I drilled a few I figured I was committed and had to stick with my plan and keep going. Notice the crappy looking paint on the deck… I also decided that I’ll repaint the deck to hide the holes afterward - another large project!
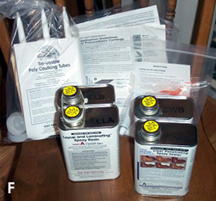
This is what $200 worth of deck repair chemicals looks like. After lots of research and silly questions on sailing forums, I decided that I would fix the deck with a treatment of CPES*, L&L*, and Fill-It*. (Pic F). All this was from the “Rot Doctor” company here in Seattle. These guys are GREAT! They answer emails, give support and lots of advice over email 7 days a week and after just a few hours. A+ service!
First, read the instructions. I hate to admit and document the fact that I had to read directions, but when you spend $200 on a few cans of smelly stuff, you better do it! I also wore a cheap monkey suit since the CPES* treatment is VERY sticky. Make sure you get the right size. This was a large, I should have gotten extra-large since this suit was giving me a wedgie while I was working - until a certain part of it tore.
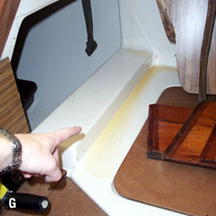
The CPES* wood treatment in addition to being very smelly and sticky, is also very runny. I was squirting it into the deck holes up front, and leveled the boat as well as I could before starting, but not enough. The CPES* was later found in a large puddle at the back of the boat on the seat (Pic G). This is where the ‘tea’ colored water used to pool after it rained…the reason for this repair in the first place. I gave a good dose of CPES* in all the holes then left the boat to sit for about a week while it soaked in and did it’s job. Amazing stuff, I’m impressed with what it’s done so far.
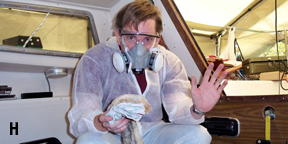
Here I am fully protected with my anti-sticky suit, respirator and protective eyewear (Pic H). I also had gloves, but I was carefully wiping up a puddle at this point. The respirator is definitely a ‘must have’ for boat restoration. The chemicals you use for this work will probably dissolve brain cells, put you in a coma and kill you dead if you inhaled that stuff. If you lived, you would probably be about as active and useful as a well cooked brussel sprout. So protect yourself!
Part II: Laminating the Repaired Deck
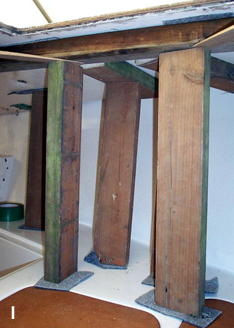
First thing I did was set up the deck support from underneath (Pic I). When I was done, I will put a bunch of weight as well as a few c-clamps around the edges to squeeze the deck together. I cut up some scrap 2x4s leftover from my fence project and put them in using carpet scraps to protect the fiberglass and pounded in some shims at the top to get a good tight fit. I was careful to make sure that it didn’t go too tight and bow the deck upwards, but keep it flat - I did see this happen when I had the wood too tight.
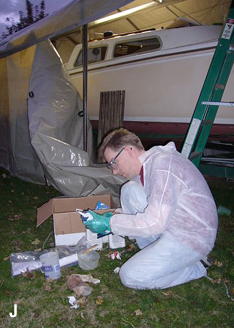
Again, it hurts to admit and document this, but I DID read the instructions again! Here I am with my protective monkey suit preparing to mix up the 50/50 hardener and resin (Pic J). This is the “L&L*” from Rot Doctor. It’s a strong type of epoxy that has a slight flex to it so it won’t crack over time. Spendy stuff though, it was about $90 for this alone.
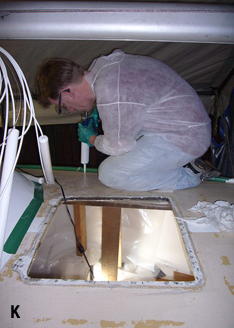
The fun begins! (Pic K). Fortunately this wasn’t as stinky as the CPES*, and I had good ventilation through the front of the canopy so I didn’t use the respirator. I did wear splash goggles just in case. As cool as this stuff is, it was really miserable to work with. Very sticky, and the caulking gun method didn’t agree with me very well. I found a small kitchen syringe at Target for about $2.00 which didn’t hold as much as the caulking gun, but I could just suck it in and squirt it down the holes.
See the green duct tape? Don’t do that. Use good masking tape! We all know that duct tape leaves a gunky mess after it’s been stuck for a while. I guess I used it since I had a lot of it already. Dumb. I did get the gunk off but it wasn’t fun. If you look closely at the photo you might see I had some clear tape along the exposed edge of the deck where the hatch goes. I taped up those edges pretty well to keep the resin from spilling down in the cabin, and also so I could tell when I had enough in there. Just keep squirting until it comes out of another nearby hole, then move on to another hole… repeat.
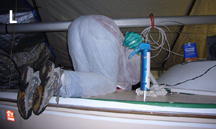
(Pic L) Not a very dignified shot of me, but always make sure you don’t have any epoxy leak down below. The stuff is pretty thick, but it will run downhill. I didn’t want to find a thick puddle later on that would require a lot more sanding and cussing.
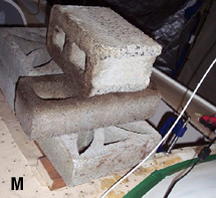
It took a couple evenings to get all the holes filled, but I did put some weight on top to keep things glued together (Pic M). I left this pile in place for a couple weeks while I worked on other parts of the boat.; After a week, I checked it and was kind of disappointed that the deck still had more flex than I wanted. I just left it for longer and finally checked it a couple weeks later and found it very firm. It has about as much flex to it as the other side of the hatch that didn’t need it. I also used some c-clamps on the edges of the hatch to hold that tight - you can see one of them in the photo. See that duct tape? Don’t do that.


After the deck was hardened up, I started filing the holes with Dr. Rot’s “Fill-it*” epoxy. (Pic N). Took a few nights of shoving sticky goo into the little holes, packing it in and wiping them off… all while either hunched over, lying on my belly on the deck or sitting in the hatch.
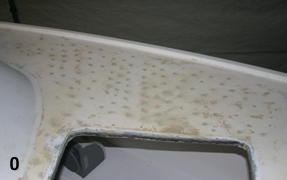
Finally! The holes are filled (Pic O), deck is firm and the deck is ready for new paint - after the old paint is removed… (Pic P) All finished painting… (Pic Q)… and ready to go!

* These products are unavailable, we are selling comparable products that will perform these same tasks. Feel free to contact us if you need assistance with which products to use.
Have questions?
Contact us by phone 206-364-2155 or e-mail (send us your pictures) at drrot@rotdoctor.com and we will gladly answer questions about our products or how to apply them. With 20+ years of experience and many more in the boating and construction industries, not much surprises us. We are here to help our customers solve their issues. Let us help you to not have any surprises in your repair project.