
Home > Fiberglass Boats- Rot Repair in Glass Boats
Rot Repair in Fiberglass Boats
Quick click to:
The Transom
Click on images for a close-up view
You can read a lot of glass boat repair manuals and never see anything on the self-repair of transoms. The reason? In boat repair circles it is a job for a professional yard — tear the old transom away and replace it. This is usually estimated at a cost somewhere between $2,000.00 and $5,000.00 or more depending on the size of the boat. The problem? Who has that kind of money to spend on an old used boat?
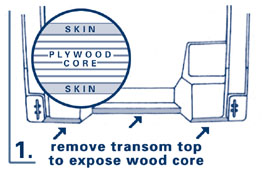
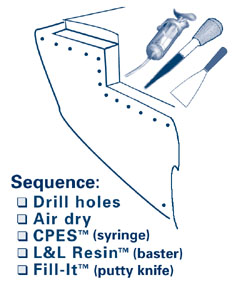
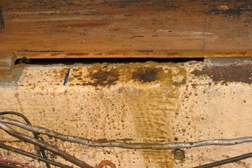
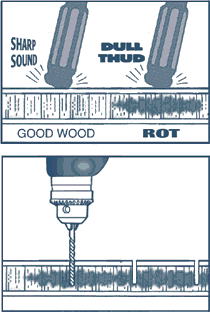
We sell a lot of product to people who decide to make the transom repair themselves, because for a lot of reasons our products are especially suited to this kind of work. There is no penetrating epoxy except CPES™ that has the ability to deeply penetrate bad wood areas, and almost all glass boat transoms have wood cores. You can see in the top picture what the typical cross section of a fiberglass transom looks like. It’s a laminated ply structure and very subject to rot. Whatever original wood that remains must be treated with CPES™ to harden it and to eliminate the rot fungi. The thick epoxy resin you use for a partial fill must be simple to use, very slow-setting, strong and slightly flexible-which pretty much describes our Layup & Laminating Resin™. Epoxy fillers must be strong and able to bond with the CPES™ treated wood or resin, and be sandable.
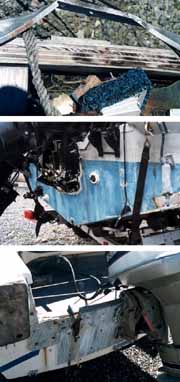
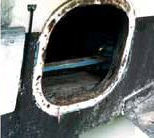
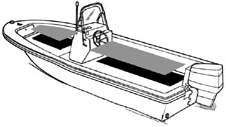
How does the water get into the transom? Just look at the second picture of a standard outboard powered boat. I can count from this shot 25 separate glass penetrations in the below-water transom area. Think any of them leak? You betcha! Just let a little water in, give it a bit of air and some heat, and you have potential rot. It is a slow, insidious process until a lot of wood is destroyed and the transom starts to flex and sag. Nothing to do now but repair it.
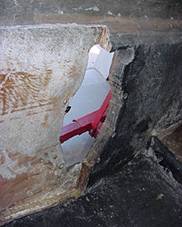
Of course, there’s always the ad hoc lets-put-it-off solution, and the third picture shows you what a through-bolted piece of aluminum plate can do. Doesn’t look too elegant, but it must work for this guy. For awhile anyway.
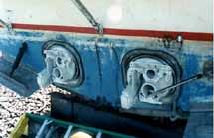
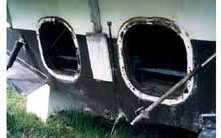
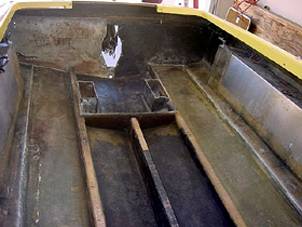
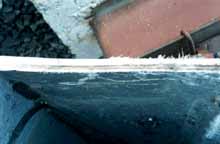
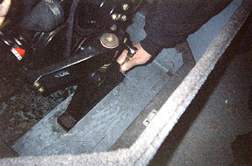
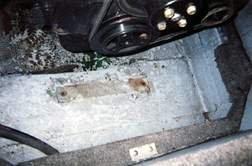
You’re lucky if you have a boat with an outboard-fewer holes and easier access (if you can consider anyone with a rotted out transom “lucky”). Many of the older, smaller boats have a metal or plastic channel piece across the top. This can be removed, which is important, as we’ll see in a moment. But take a look at the I/O boat transom below, with the through-hull units in place and with them removed. Lots of torque on these brackets and plenty of bolts to leak, not to mention the other fittings. You can see by the close-up that inside a thin glass layer is an all wood laminate. It’s difficult to repair a rotted I/O transom without removing the through-hull units, although it’s do-able.
Click on images for a close-up view
The key to repairing a rotted-out transom is gaining access to the wood inside of the transom. Sounds obvious, but many try to avoid it. It’s important because it allows at least some of the bad wood to be removed, and allows what’s left to dry out. Epoxies do not penetrate wet wood very well. How you do this will depend on the construction of your boat. As we mentioned, with an outboard hull you can remove or cut away the top of the transom, put it aside and then replace it when the job is done. More often than not the rot is in the center section and the sides are intact… you’ll find out when you get into it.
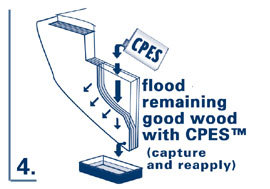
A word here about the resins. Don’t even consider trying these kinds of repairs with polyester resin. It hasn’t the adhesion and it hasn’t the strength or flexibility. You must use epoxy. For the initial penetration and treatment of the rotted area you should only use CPES™. Quite frankly, there is no other “penetrating epoxy” on the market that will even come close to penetrating as deeply as CPES™ does. We know. We’ve tested them. You can see the results on our web site under the Product Testing section. As for the thicker resins used for adhesion and fill, as well as the epoxy fillers, ours have some significant advantages over other manufacturers’ products. I won’t detail them here; you can take a look at the “More Information” section next to each product.
The wood you use for fill can be standard exterior grade ply, which you will thoroughly treat with CPES™ after it is cut, glued, and is ready for installation. You can use higher grade wood laminates if you wish a bit more “solidity”, again treating them with CPES™ before installation.
Example of Transom/Stringer Repair
A clean, professional repair in progress by one of our customers: Stringers were evaluated. Where the wood was weak the stringer was saturated with CPES™ and Layup & Laminating Resin through drilled holes. New flooring was installed. Closeup of transom (right) shows how bad wood was cut away and surfaces cleaned for the installation of new wood. All new wood going into the boat was treated with CPES™ after being cut and trimmed.
Outboard Transom Repair
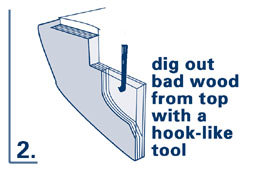
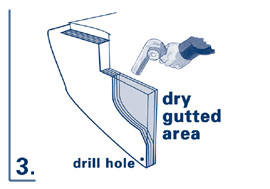
Most of the older outboards have relatively simple center-section access. You remove the top and there you are. The risers on each side can present a problem if the rot has gotten that far. If so, more often than not you’ll be in for some serious fiberglass cutting. Remember though, if you cut carefully and save the pieces they can often be replaced with an epoxy filler as a bonding/filling substance.
Let’s take a look at a standard repair:
IMPORTANT: to prevent recurring rot, all wood in the surrounding area (even if it is not rotted) needs to be treated with CPES™ as well. The rot fungi are there. You can use a spray or a swab but you must get the CPES™ on the wood.
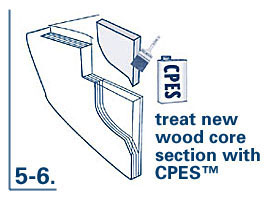
6) Measure, cut, glue (if required), and CPES™ treat the replacement wood. This can approximate the size, because you’re going to fill around it with a resin-mix.
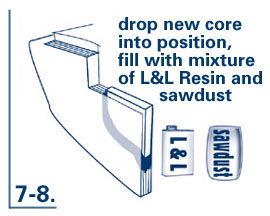
8) Allow 24 hours for preliminary cure.
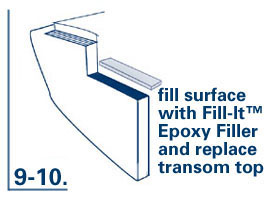
10) Replace the top on the transom. Re-drill motor mount holes. Bed everything back in place. Remember what we said above about bedding compounds: Don’t use silicone and make the process a two-step procedure.
If you get into the side risers you are basically repeating the above process. It can be done in stages if necessary.
The method above was used by one of our customers to repair their transom. We feel that it was a very well planned and executed repair, and as the process was well documented, we thought that you might like to see the results. The following link is to a copy of the web pages that he put online, and was kind enough to let us incorporate into our site. To view the repair job, click here
VARIATION: On some boats it is possible to get at the transom from the inside. There are advantages to this method; for one, it would not scar or deface the outside of the transom. Simply cut away the inner face of the transom, save the glass piece if possible, and tear away the bad wood. Treat any wood left inside with CPES™. Cut new wood and treat with CPES™ and insert into transom, clamp/epoxy-glue it to the back of the transom, fill in all gaps with either the Fill-It™ epoxy filler or a putty-mix of the L&L Resin™, and then re-glass the inside. It’s real work.
UPDATE: After 2 years, the original repair repair mentioned above is still going strong according to the customer. If you want to read his report and see the pictures, please go here.
AN EASIER ALTERNATIVE…
The easiest method of repairing transom rot is through drilled holes (much like deck repair), but the results are far less certain. It can work well enough, though, particularly in situations where there is adequate time for the transom interior to thoroughly dry.
- Drill ¼″ holes across the top of the transom, about 5 to 7 inches apart and allow the interior to air dry.
- Drill a drain hole at the bottom.
- After the interior is dry, inject the CPES™ into the holes, recapture excess at the drain hole, and re-inject.
Allow at least two weeks for the CPES™ carrier solvents to evaporate away. - Close the bottom drain hole with Fill-It™ epoxy filler.
- Using a turkey baster, flow pure mixed Layup and Laminating Resin™ into the holes. Keep applying it until the holes will accept no more. Let cure 24 hours.
- Close the holes with Fill-It™ epoxy filler. Sand smooth and apply a water-barrier paint.
It needs to be said again: this way is not as thorough as the standard method. For best results, and especially for extensive rot, do the extra work, and get to the core of the transom from the top or inside.
Inboard/Outboard Transom Repair
Most often the rot in I/O transoms is right around the mounting bracket openings. Again, its a matter of hooking out the bad wood until you get to the good wood. If the rot goes further than you can reach, then you’re going to have to get at the transom wood from the top (review this procedure in the Outboard Transom Repair section). As we mentioned, this can be a total hassle but what can we say? Cut carefully, save the pieces, and then re-install with epoxy filler.
Getting new wood into areas that is above the mounting holes will involve bedding it in our Fill-It™ epoxy filler (after CPES™ treatment, of course) and propping it in place for 24 hours until the filler cures. If you wish you can fill overhead space entirely with the Fill-It™ epoxy filler. This may take two applications to get a smooth final fill. For awkward areas, the CPES™ can be sprayed on or injected into the wood, allowing the wood to absorb as much of the liquid as it can. It is essential that the face of any wood not replaced be thoroughly soaked with CPES™.
When finished re-drill bracket holes and bed everything down.
Note: We have had customers who have cut away exterior transom glass to get at the rotted wood inside, and they have done this without removing the outdrives and mounting brackets. After the repair, the glass panels are bonded back in place with Layup & Laminating Epoxy Resin™ and the cut grooves filled with Fill-It™ epoxy filler, the surface sanded and then painted with a polyurethane paint. It can be done.
Floor Replacement
One of the most common areas of damage on fiberglass and pontoon boats is deteriorated or rotted-out cockpit/deck flooring. The reasons are obvious: water saturation through leaking glass laminate and plywood. Sometimes this can be repaired by treating the existing wood or by drilling access holes in the glass laminate and injecting CPES™ (Clear Penetrating Epoxy Sealer) and, if the damage is severe, Layup & Laminating Epoxy Resin™. We cover this process under Deck Repair in a later section.
Often, however, it is easier and more thorough just to pull up the old floor and replace it with new wood. This also will give you a look at the flooring sub-structure, the fore/aft stringers and the supporting cross beams. Sometimes they require repair as well, and we do cover this process under Stringer Repair in a later section.
When making the floor replacement, there are some special considerations regarding type of wood and its treatment before the wood is installed. The object is to give you a new floor that will withstand future water saturation without rotting out again.
Treatment of the New Wood
After the wood is cut, trimmed, drilled and ready to install, it needs to be treated to prevent deterioration and delamination. The product of choice here is CPES™ (Clear Penetrating Epoxy Sealer). The CPES™ will penetrate deeply, especially on cut edges, and prevent the wood from absorbing enough moisture to support fungal and bacterial activity. We recommend at least two generous coatings on all cut edges, and three coatings is better. The flat bottom of the sections should receive two coatings, and the top one coating. All drilled screw/bolt holes should also be treated with CPES™, and if you are applying self-tapping screws a puddle of CPES™ should be put on the wood before the screw is drilled in. The threads will drag the CPES™ into the wood as they penetrate. On new wood you can figure coverage will be about 250 sq. ft. per gallon of CPES™.
Installation of the New Flooring
How you install the new flooring will depend on the structure of the hull or floats and what you have torn away. If you are going to bond the new flooring to the hull, then use only epoxy resin, such as our Layup & Laminating Epoxy Resin™, and ’glass tape. Polyester resin will not bond well with epoxied surfaces, and is not nearly as strong as epoxy.
Covering the New Flooring
There are a variety of ways to cover the new flooring for traction and protection from moisture. The ultimate would be new glass laid down in epoxy resin. We strongly suggest that you do not use a polyester resin. It will bond to plywood that has been treated with one coating of CPES™, but polyester resin does not bond really well with anything. A few extra dollars and you can use epoxy, which will make the floor almost bullet-proof. We suggest you consider our Layup & Laminating Epoxy Resin™. It’s an easy 1:1 mix, bonds extremely well, and always retains a slight degree of flexibility. It can be laid down with 8 or 10 oz. cloth, or heavier if you wish. Do NOT use glass matting.You can finish coat with a polyurethane paint, carpet or our Elasta-Tuff™ 6000-AL-HS.
Outdoor carpeting can also be put over the new flooring, and any exterior grade carpet adhesive will bond with the CPES™ treated wood. If you use outdoor carpeting, we strongly recommend that at least two coatings of CPES™ be applied to the surface first, and allowed to cure. Three coatings would be even better. This will give the wood protection from the moisture that will inevitably collect under the carpet surface.
Finally, paints or waterproof elastomeric coatings can be applied. We suggest that you consider our RHINO TOP, which is an acrylic/epoxy water-based coating that can have spherical sand suspended in an emulsion for traction. We have tested this material on plywood and we are impressed with its durability. It’s available in a number of colors, and can be retouched as necessary. Specifications on RHINO TOP can be seen under our Polyurethane Coatings section.
If you want to totally waterproof the wood, we suggest you use our Elasta-Tuff™ 6000-AL-HS polyurethane coating, the RHINO TOP as a final coating over our ELASTUFF 120, or the Elasta-Tuff™ 6000-AL-HS as a topcoating over the ELASTUFF 120. The techniques and relative costs of these polyurethane coatings are outlined in our Polyurethane Coatings section.
Stringers and Supports
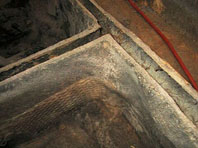
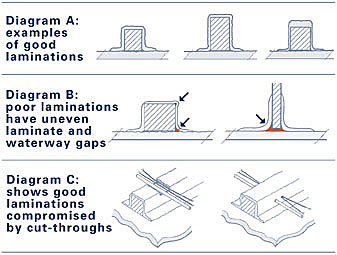
Next to transoms, stringers are the glass boat owners’ biggest concern. Transom rot and stringer rot are often associated. Again, this is primarily a power boat problem because the impact forces generated on the bottom of the hull require substantial stringer reinforcement. Nowadays these are usually wood chopper-glassed over, although a few use a glass molded unit and on older boats they laminated a mat, cloth, or roving mold over the wood to create a strong structure (see photo at right and Diagram A below). These are better, of course, than the cored stringers where the wood is the main structural support, but result in a more costly boat. Where cloth or roving is used over wood, most of the strength is in the glass. If you have about ¼″ or more of glass around the wood in a “hat” section and the glass is securely bonded to the hull then the wood becomes almost redundant (see photo below left). Even so, you often get rotted wood because of poor lamination. If it is not laid down carefully and there are waterways left, long gaps that allow water to work it’s way along the wood as in Diagram B. Sometimes the boat manufacturers drill or notch them (Diagram C) and the water gets in. When you inspect your boat, these are the areas which need a thorough CPES™ treatment, even though there is no evident sign of rot.
Click on images to get a close-up view
You can see from the photo (top far left) how a typical small hull is stringered. The bottom left photo is closer and shows the floor over the stringer. The top right photo is a close-up and gives you a picture of a bare wood stringer on top of a glassed stringer. You can see the gaps between stringer and hull, a perfect water channel. The glass laminate over the stringer is not thick enough to provide structural support if the wood rots. The bottom right photo shows where they glassed the stringer and then actually cut away a section so the floor could be mounted. Duh! An open invitation to wood rot.

Click on image for a closer view
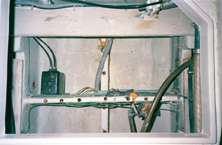
Photo (above): shows drilled holes in stringer and cross-bracing that have been treated with CPES™ and then filled with a slurry mix of Layup & Laminating Resin and fine sawdust. Structural strength has been returned to the stringer and cross-bracing.
The rot process is often from the top down. Water on the floors leaks through and gets into the stringers. You go to fix the floor and find that the glass is delaminating around the stringers and the wood inside is rotted. The illustration above shows the layout and you can see how the pattern progresses. Too often the manufacturers fasten the floor on with screws, right through the glass on top of the stringer. A perfect channel for water. On a sailboat hull this is less a of a problem because the floors are generally covered and the water doesn’t get there. The cored decks and cabins of sailboats are another problem which we’ll get to later.
Getting to the stringer is often the problem. You may have to rip out sections of the interior. You then have to cut away the top of the stringer. Pick your tool. There are some specialty instruments that are capable of making these cuts, from Dremel tools to small battery circular saws to hole saws. The photo (top right) shows a stringer with the top cut away and the wood showing. Any wood that is left should be reasonably dry and treated with CPES™ to greatly reduce the rot fungi problem. The CPES™ should be allowed 3–5 days for the carrier solvents to evaporate away and the epoxy to start to cure. You can then glass everything back in. You must use epoxy resin because polyester resin will not bond well with epoxy, which you now have on and around the wood.
How do you repair a rotted stringer? Ideally, you replace the wood. This is what we recommend. It’s worth extra rip and tear work to do it this way. You pull out the rotted portion, cut a long angle on the remaining good wood and the new wood, and then splice it in, using Layup & Laminating Resin™ to join the two pieces. Gaps can be filled with the Fill-It™ epoxy filler. The new wood going in should be thoroughly saturated with CPES™, and then all vacant areas filled with the L&L Epoxy Resin™.
There is an alternative to the above process, but it’s not nearly so thorough. Still, in some cases it’s enough to keep an old boat going for a few more years. Basically what you do is drill access holes in the top of the stringer 5 to 7 inches apart, allow the wood inside to dry (or blow dry it), treat with CPES™ injections, and then fill all voids with Layup & Laminating Resin™. Make your holes large enough to accept the tip of a turkey baster—it’s the simplest way to get the resin in. It’s not a complete solution because you can’t see what you’re doing, but it will supply some substance and stiffness to the stringer. You will have to allow at least 2 weeks after the CPES injection for solvent evaporation and epoxy cure before putting in the Layup & Laminating Resin™.
The wood that was above the stringers (floors, spacers, etc.) should probably be replaced as well. Treat the new wood thoroughly with CPES™, especially the edges. If you want complete protection, you will pre-drill fastener holes and treat them with CPES™ before installing the screw or nail.
Click on image for a closer view
Support planks and sections should be torn away and replaced if at all possible. These are normally plywood which has been chopper-glassed, as you can see in the photo (left). If the moisture gets in then the ply delaminates and rots. This is repairable with epoxy if absolutely necessary. The wood must be dry and the top must be open. It’s then just a matter of soaking the inside ply with CPES™, allow about a week for the carrier solvents to evaporate away, and then follow up with the Layup & Laminating Resin™ to fill interior voids. You can then re-glass the top edge. It is possible to leave the top of the plywood un-glassed, as the CPES™ and Layup & Laminating Resin™ will now pretty much waterproof and substantially protected from any future rot problems, but only it the top glass is not required for structural stiffness.
All of the interior wood repair on a glass boat is best done in the spring, after the boat has been out of the water, under cover, and dried out. No epoxy effectively adheres to wet wood, and CPES™ certainly will not displace liquid water. A bit of moisture is okay, for there are carrier solvents to help displace them.
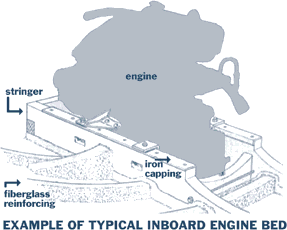
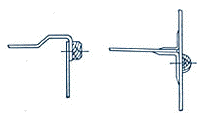
Engine Beds and Mounts
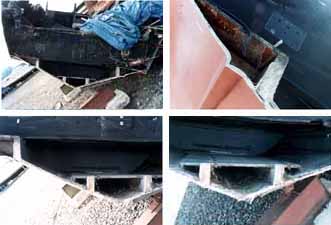
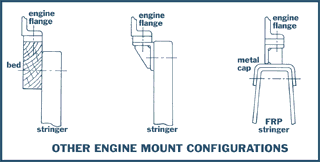
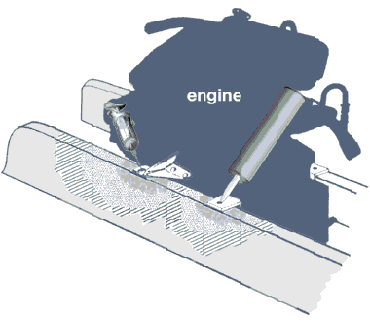
Engine beds and mounts can be a problem on older glass boats. Running hours alone tend to shake things loose, and then add a little water to soften things up and the engine starts hopping around. Here is a typical inboard engine installation for a shaft drive. It is the usual 4-point mount onto a steel frame over wood beds. Other mounting configurations are shown below. The photograph shows a typical I/O mount with steel pedestals through-bolted on a chopper-glassed wood beam.
Click on image for a larger view
Engine Mount Repair When the Wood Is Accessible
The wood is usually integral to the mounting system; if it goes bad then things shake loose. Repair will depend on the extent of the damage. If the wood is totally shot then it should be replaced. This can be a hassle because you’ve got to pull the engine. Just as often the damage is a matter of stripped-out mounting hole wood that has gone soft. This can sometimes be repaired with the engine in place, or the engine can be jacked up and skidded over to give access to the hole. Repair is then usually a matter of cleaning out the hole (drilling or chiseling), saturating the newly exposed good wood with CPES™, inserting new wood which has also been CPES™ treated, and then embedding the new wood in Layup & Laminating™ Epoxy Resin. After this you re-drill the mounting hole, treat it with CPES™, and then fasten the engine back down. You may have to do a bit of re-glassing as well, being sure to use epoxy resin, not polyester.
And you might as well repair all the mounting holes as long as you are involved in the process. If one is bad then the others are likely not in great shape either.
For the above process to work the wood must be reasonably dry and oil-free. (Wood with oil on it should be drilled or chiseled away.) Blow the holes with a hair dryer for a few hours before proceeding with the CPES™. Allow at least 3 days to pass after the CPES™ treatment for the carrier solvents to evaporate away before proceeding with the wood and L & L Resin rebuild. After that 48 hours between steps is sufficient.
One way or another the repair process outlined above will work on just about any wood/steel engine mount configuration where the wood is accessible.
Click on images for a larger view
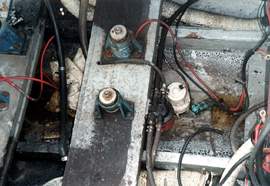
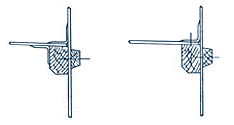
Repair When the Wood Is Inaccessible
In the smaller fiberglass boats the wood for the engine mounts is usually part of the stringer assembly and encased in fiberglass. To repair the wood would mean removing the engine, cutting the top off the stringer, replacing the wood, and then re-glassing the top of the stringer back in place. A lot of work. The top picture to the (right) is an example of mounting bolt holes drilled through the fiberglass laminate and into the wood. The lower pictures show a motor mount bracket being removed and the sunken area under the bracket due to rotted wood.
There is an alternative method which is often used successfully. The repair is made using our CPES™ to treat whatever wood that remains (stopping the rotting process and hardening the wood), and then vacant areas inside the stringer are filled with a soft, pourable mix of our Layup & Laminating™ Epoxy Resin and sawdust.
Loose, deteriorated wood is vacuumed out of the holes, CPES™ is squirted inside to treat the wood, and then a few days (or longer) later pure L & L Resin is flowed in to further consolidate the wood. Following this, a very soft mix of the L & L Resin/sawdust is poured/pumped in, but not to the fill point. This is given 24 hours to cure, and then another stiffer mix of the L & L Resin/sawdust is pumped/packed in to the fill point. New bolt pilot holes are drilled and new lag bolts installed.
Rot Repair to Inaccessible Wood in Engine Mounts
Note: Process may vary depending on what is in the hole. If stringer is empty, go straight to steps 3 and 4.
Basically this forms a very strong plug inside the stringer to hold the engine securely in place. It doesn’t solve the whole stringer problem, but much of the stringer strength is in the fiberglass “hat-section” formed by the stringer itself. The fiberglass on some stringers approaches ¼″ in thickness, in which case the wood interior is almost redundant.
It’s important in these kinds of repairs to use our Layup & Laminating Resin, because it has a slower setting (time to settle) and because it will never shatter or crack under loads. In hot weather these repairs should be made at the coolest part of the day, since heat accelerates the cure time of all polymer resins. And don’t even think about using the standard polyester resins. They set too quickly, are brittle, and not sufficiently strong for an engine mount lag/bolt.
Don’t skimp on resin use! We realize that epoxy resins are expensive, but it takes an adequate amount to create the solid base for your engine lags/bolts to attach to. Just remember that the resin is a lot less expensive than paying someone to remove the engine, cut the tops off the stringers, replace the wood, re-glass the stringers, and then re-install and line-up the engine.
Here is a step-by-step outline of the repair procedure:
1) Remove the existing bolts/lag bolts that hold down the engine. You might want to check them all while you’re going through this procedure.
2) Remove any aluminum plates or other items have been added to improve the structure.
3) Take a stiff hooked wire (such as a bent coat hanger) and probe around inside the mount hole. Any soft wood should be broken up and shop-vac’ed out of the hole. It will also give you a rough idea of the amount of Layup & Laminating™ Epoxy Resin you will need. You can estimate the cubed inches of interior vacancy and then convert cubic inches into fluid ounces, and then fluid ounces into pints/quarts/gallons.
4) Give the areas a few days (or longer) to dry out, that is, vent away moisture that may be trapped inside the stringer fiberglass laminate. Compressed air can also be used to dry wood quickly.
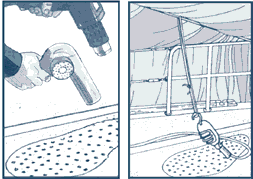
5) Using our injection kit or ketchup dispenser or something similar, squirt the inside of the stringer with our CPES (Clear Penetrating Epoxy Sealer). This will harden any remaining soft wood, and it will help eliminate all fungi/bacteria in the wood. You’ll need about ½ to 1 pint of the mixed CPES per mounting hole, depending on the size of the stringer.
6) Wait for a few days while the CPES gasses-off the carrier solvents.
7) Now, if there is any wood remaining inside the stringer fiberglass laminate, pour in slowly our mixed Layup & Laminating Resin. This will gradually be absorbed by the wood and will make it very hard. You will need about ½ to 1 pint of the L & L Resin per mounting hole. If there isn’t any wood inside the fiberglass, then you’ll proceed directly to Step # 8.
8) Mix our Layup & Laminating Resin, add some of our fine sawdust until you get a fairly thick but still pourable mix. Pour or pump (see our Reusable Caulking Tubes) it into the mounting hole. If you have first put in the pure L & L Resin (Step # 7) and there is still space inside the hole, then add the L & L Resin/sawdust to those mounting holes as well. Pour/pump in as much of the resin/sawdust as the mounting hole will take in about ½ hour period of time. You’ll probably use anywhere from a pint to a quart of the resin/sawdust per mounting hole, depending on the amount of empty space.
9) After 24 hours the resin/sawdust will have cured. You should be able to see it in the hole. Come back now and mix a thicker mix of the L & L Resin/sawdust and using our re-useable caulking tubes pump or pack it down into the hole until it backs up against the poured mix. Level off at the surface.
10) Drill new lag bolt holes in the resin/sawdust mix, and screw in the lags.
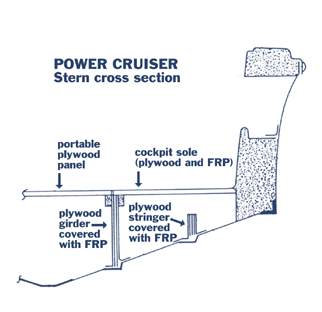
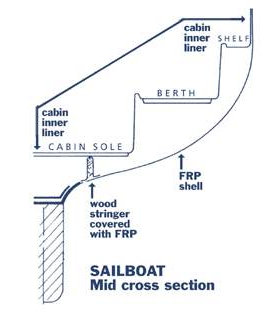
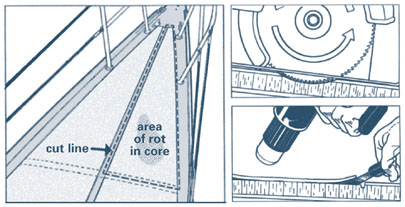
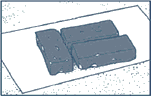
Wood-Cored Decks
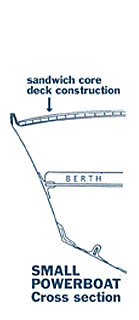
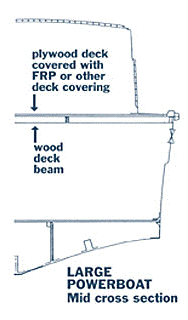
Rot and general wood deterioration in cored decks is a particularly difficult problem, largely because it’s so hard to get at. We hear more about it in sailboats than power boats, probably because sailboats have more hardware sticking through their decks (and therefore more locations for the water to get in), and because they are often driven harder in worse weather conditions than power boats. Below is a general diagram section of a sailboat showing the cored decks and cabin top. What this doesn’t show are the sail tracks, chain plates, stanchion bases, winches, cleats and so forth that are poorly bedded or work loose and allow the water into the wood interior. Believe me, the water is bound to get in. The wise skipper will apply CPES™ generously to every hole whenever a screw or bolt is removed. You’ll never completely keep the water out but you can treat the wood so it’s nothing that fungi or bacteria will want to eat when rot conditions become a factor. The diagrams below show a small and large power boat with wood-cored decks.

Click on pictures for close-up view
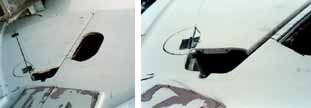
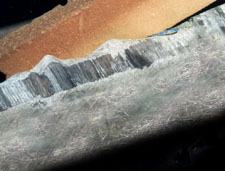
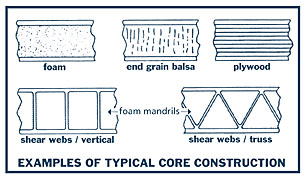
Decks are most often cored with plywood or end grain balsa. Occasionally foam or a plastic core system is used, but usually not. The diagram shows some typical cores, and a couple of photographs of a power boat deck showing the wood core.
Once the deck or cabin core decomposition becomes severe you’ll know it: Things get a bit springy up there. Mild decomposition may not be so evident, but can be detected by pulling bolts/screws and inspecting the holes, or by tapping the deck and listening for tonal differences. If there a lot of air under there, it sounds hollow. You can also test drill through the deck to take a look. More often than not you’ll be right so the test hole is no issue. If the wood turns out to be good, squirt it with some CPES™ and then after the CPES™ cures fill in with an epoxy filler. Our Fill-It™ dries just off white and smoothes nicely.
Repairing Rotted Cores — Method 1:
Removing Deck Skin and Replacing Core
How you repair rotted cores will depend on a lot of variables: How large the rotted area is, what it is, where it is, where the boat is and what kind of weather protection it has — and how patient you are.
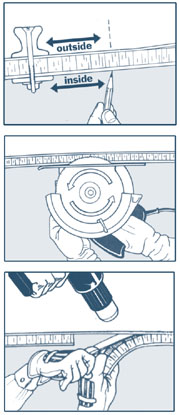
There are two basic problems: 1) Accessibility to the deteriorated area and 2) drying things out. Epoxy will not effectively penetrate wet wood; the wood has to be reasonably dry. So, obviously, the best solution is always to pull the top off the deck and scoop out the bad wood and replace it. Easier said than done, right? On sailboats, especially, this can be a nightmare, with all the hardware scattered around. Still, it might in the end be worth it because things happen a lot faster this way. You treat the edges of the bad wood area with CPES™, and the new wood if it’s ply, and then re-install. With balsa you must put it in place first because the backing compound is dissolved by the CPES™, or you can order the balsa core without the film backing. For bonding use our Layup & Laminating Resin™, but wait until the CPES™ on the treated wood has cured. In a perfect world you would replace with a plastic honeycomb instead of wood, but we’ve been told many times that plastic core material is hard to get in limited quantities. Below is a rough schematic for removing outer glass deck skin. There are various ways you can accomplish this task; this is just one of them.
Removing Outer Skin
- Plan and mark your cut wisely. Plan a cut with future restoration in mind. Use straight lines. Consider placement of non skid overlays and deck fittings.
- Set cut depth to glass thickness only.
- It may be necessary to work skin free from core with the edge of a putty knife; apply heat to loosen further if needed.
- Try to remove the skin intact. It can be reapplied over the new core.
Removing Inner Skin
On some boats, especially the smaller ones, it is sometimes possible to get at the deck core from inside. Removing the inner skin is the preferable way of gaining access to the damaged core because it leaves the exterior surfaces unmarked. The schematic (right) shows steps for inner skin removal. Once again, old remaining wood and new wood core material should be CPES™ treated and bonded with our Layup & Laminating Resin™.
TIPS FOR REMOVING THE INNER SKIN
- Outline the damaged area with straight lines and using a paper pattern transfer this outline to the inner skin. Line up exactly by measuring from permanent deck fittings or bolts.
- Drill an exploratory hole to determine how far the underside of the outer skin is from the surface of the inner skin. Fit a circular saw with a carbide-tipped plywood bit and set the cutting depth to slightly less to allow for some variation in this dimension. Cut around the outline.
- Finish the cut through the core with a razor knife. If the top skin bond is completely broken, the cutout will drop out. If not, find a loose corner and pry down, then use a sharpened flexible putty knife as a chisel to free the rest of the core. Heat applied to the outer skin may help.
Replacing the Core
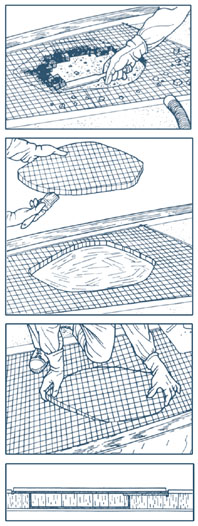
- Chisel the damaged core from the inner skin or use a utility knife (for balsa or foam), or a saw (for plywood). Carefully and thoroughly clear the inner skin of any old core material.
- Make a paper pattern of the empty section to cut new material.
- NOTE: it is important to use core material the same as the original, both in type and thickness. The exception to this would be the plastic honeycomb core material—which can be mixed with other types. It should be the same thickness, however.
- Dry-fit the core into the cavity, trimming as necessary.
- Wet out the surface of the old core and skin where the new core will bond with CPES™. Allow 1–2 days for CPES™ carrier solvents to evaporate.
- Wet out all bonding surfaces, both new and old with Layup & Laminating Epoxy Resin™ thickened with talcum powder or colloidal silica to the consistency of mayonnaise, and put new core in place. Brace or weight the core in position, and allow to it to cure.
- Wet the old and new core with CPES™ and allow 1–2 days to cure.
Replacing the Deck
How you replace the outer deck skin will depend on how large the area is and how it relates to the hull structure. Ordinarily the skin section can be placed back over the new core with L & L Resin bonding and the cut edges later filled with our Epoxy Filler and then sanded smooth. However, if you are concerned that this will not present the same strong structure as it was originally, we recommend you use the steps shown below to restore the deck. Use only epoxy resins for re-bonding, and we can suggest our Layup & Laminating Resin™ as being an excellent choice. It has a long pot life, is a simple 1:1 mix, and remains slightly flexible after curing. After major repairs you may elect to cover the deck with one of the non-skid flexible coverings. It will hide all your cut and scratch marks.
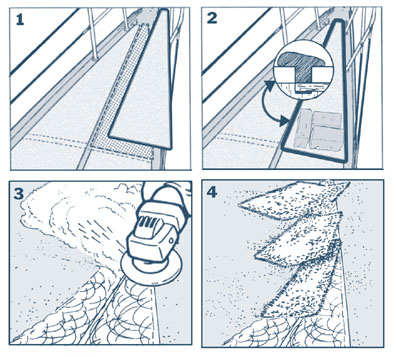
- Fit outer skin over new core.
- Bond with thickened L & L Epoxy Resin. The core should be solidly bedded in the thickened epoxy, and epoxy should squeeze out the cut line all around the new section. Cure thoroughly (at least 24 hours), compressed with weights. (Place polyethylene plastic sheeting between weights and skin).
- After resin mix has cured, sand/bevel seam areas into a shallow v-shaped depression with the original cut line in the deepest part of the ‘v’.
- Cut fiberglass cloth into narrow strips (or use fiberglass tape) and laminate them into the depression with straight L & L Epoxy Resin. Each strip should be about 1 inch wider than the previous one.
Finally, sand the cured surface, then paint with a water-barrier coating or cover with non-skid flexible covering.
Repairing Rotted Cores — Method 2:
Treating Core Without Removing Fiberglass Skin
Many of you will elect to repair the core without removing the deck skin. On smaller areas especially this will be the case. Sometimes, though, the glass skin is just too difficult to remove, or, it’s an old boat and you just don’t want to expend the time and effort. It’s possible in these cases to perforate the outer skin with drilled holes, dry the area underneath, and then inject with CPES™ (Clear Penetrating Epoxy Sealer), Layup and Laminating Epoxy Resin™, and then close the holes with Fill-It™ Epoxy Filler.
The key here is drying the core material. Epoxy will not displace water in and around wood cells. Although CPES™ will partially displace light moisture, in almost all instances it will be necessary to use some sort of drying method. It can take awhile. Ideally, this is a project that can be started in the winter when boating is less frequent. The deck can be opened, covered, and then left to dry out over a few month’s time. If slow drying is not possible, there are ways to speed up the process. Here’s the procedure:
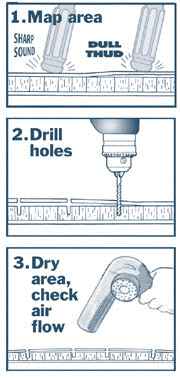
• Define the deteriorated area. We suggest first tapping it out and then going back with a drill to verify. You want to find the edges up to the good wood and mark the area.
• Once defined, drill the area with multiple holes (or see note) no further than 5″ apart. The more you drill the quicker the drying. Be careful not to drill through inner skin.
NOTE: We use drilled holes, but one of our web readers (thank you, Jeffrey Manosh) suggests slits cut with a circular saw across the deck, that is, side to side—beam to beam, which would allow more air through, easier application of the CPES™ and L & L™ Resin and better ventilation for cure time. The slits need not be all the way across and can be staggered. There would be enough deck left to supply good lateral support (most fore and aft support on boats is provided by the hull), and of course, the slits would be filled in with Fill-It™ Epoxy Filler when treatment of the core is completed. Another person, using Jeffrey’s slit method, discovered that blue painter’s tape works well as a temporary dam to keep the CPES in the slits while it absorbed into the core. He reports that the CPES did NOT dissolve the adhesive of the tape, as he thought it might. Thanks for another good suggestion.
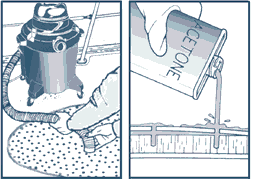
• Drying methods: a shop vac can help remove bulk water, flushing the cavity with acetone* will help carry away moisture, blown heat from a hair dryer or heat gun helps, or a utility light (one that creates heat) and finally, compressed air pumped in through holes is especially effective. Nothing dries wood as quickly as moving air. One of our customers used the shop vac and some attachments to help dry out the core, see an example of this in our Rotten‘Zine article from our customer.
*NOTE: ACETONE IS FLAMMABLE. Use caution if using both acetone and heat.
 • When core seems dry enough, flood the holes with CPES™. Our syringe and needles can be useful here. After the application of the CPES™, wait at least a week. You need to allow time for the carrier solvents to evaporate. Due to its highly fluid consistency, the CPES™ is going to reach wood that a thick epoxy resin cannot. It adds significant protection to the core.
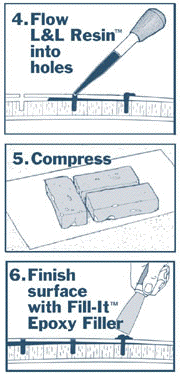
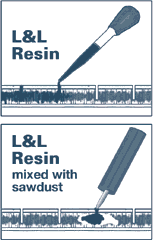 • Next, flood the holes with the Layup & Laminating Epoxy Resin (a turkey baster works very well here) or use a slurry mix of the L & L Epoxy Resin and sawdust if there is a large hollow area in the core material. Our reusable caulking tubes work well with the slurry mix. The L & L Epoxy Resin is very slow-setting and has time to settle into small spaces. It also will always retain a slight degree of flexibility. It will never shatter. The L & L Resin will cure hard in 24 hours, and will cure at
temperatures as low as 28 degrees F.
• Next, flood the holes with the Layup & Laminating Epoxy Resin (a turkey baster works very well here) or use a slurry mix of the L & L Epoxy Resin and sawdust if there is a large hollow area in the core material. Our reusable caulking tubes work well with the slurry mix. The L & L Epoxy Resin is very slow-setting and has time to settle into small spaces. It also will always retain a slight degree of flexibility. It will never shatter. The L & L Resin will cure hard in 24 hours, and will cure at
temperatures as low as 28 degrees F.
 • Compress the area with weights immediately after application of the L & L Epoxy Resin. You can use a sheet of polyethylene plastic under the weights. It will peel away without adhering to the L & L Resin.
 • Close surface holes with Fill-It™ Epoxy Filler. Paint or cover with flexible decking.
Delamination
Delamination: Decks and Cabins
Occasionally decks and cabin sides will delaminate from the core. The core itself is okay, but the glass is popped up on top. You need to drill the perimeter and treat with epoxy. Here is a schematic.
We recommend the use of our Layup & Laminating Resin™ because it is a simple 1:1 mix, very slow setting which allows the epoxy to settle into position and retain a slight flexibility after curing. For filling holes, our Fill-It™ Epoxy Filler goes in neatly on top of the epoxy, smoothes cleanly, dries in 24 hours, and can then be easily gel-coated or painted.
If there is wood involved and you suspect deterioration or rot, you can apply CPES™ first to the holes, but this will mean waiting for at least a week for the carrier solvents to evaporate away. Then the Layup & Laminating Resin can be applied.
Delamination: Hull Blisters
Blisters on the hull bottom are common on some boats. Water (especially salt water) gets under the gelcoat and into the laminate and bad chemistry results. The laminate is compromised, and unless repaired the blisters will get worse. On the other hand, we’ve never heard of a fiberglass boat sinking because of delamination blisters. No need to panic, but it does give the mind something to think about.
Vast arrays of blisters is a boatyard job. Few owners will have the time to make the repair themselves. Everything has to be ground down, dried out, and built back up with epoxy. Big job… takes time… costs money.
A few blisters are repairable by the owner, but it will take a little time. Pop them open, clean away the gunk, clean the opening area so it’s free and clear, and dry out the laminate. If you’ve got a long time (say 6 months or more) they will eventually air-dry, or you can vacuum dry them, or you can apply blowing warm air, as from a hair dryer. It will still take time — you gotta be sure things are dry. The ordinary moisture meter won’t be much help. There are specialized ones that will work, but they are expensive.
Dry until you are sure it’s dry inside. Clean out with our Epoxy Solvent or xylene. Then apply CPES™ to the area, allowing it to wick in as much as it will. Allow 2-3 days to go by, and then apply another coat of CPES™. Allow 2 days to pass. Then another coat of CPES™, one day dry time, and then another CPES™ application. You can do this as long as you want, allowing a day dry time between applications, because what you are doing is building thin layers of epoxy in, on and around the glass matrix. No other epoxy product you can buy will penetrate these very small spaces as well as CPES™. A single 2-pint unit of CPES™ will carry you through a whole bunch of blisters. From this point on you can apply a thick resin coat or go directly to a filler, such as our Fill-It™ Epoxy Filler. Push it in, smooth it off, and paint with an epoxy or polyurethane barrier-coat paint. The repair will be virtually waterproof.
Other Problem Areas
Anywhere there’s wood on a boat there’s a potential for rot or deterioration. We show below hull-to-deck joints, and the various applications of wood. If it looks bad, then clean the surface, remove the fastening, apply CPES™.
Mast steps are usually wood based, and they rot or deteriorate. It’s often easier to rebuild the existing deteriorated step than it is to pull it and replace. A combination of CPES™ and the L & L Resin™ can result in a strong step that is largely free of existing rot and protected to a substantial degree from future rot.
The wood trim on glass boats is now usually teak, which is good because it won’t rot. We should tell you that teak treated first with a coat of CPES™ will hold varnish for a lot longer than teak which is untreated. This particularly true if the varnish is a polyurethane, which seems to stick to CPES™-treated wood particularly well.
Finally, we’d like to add that we have specialty products such as the All Wood Epoxy Glue™ that will hold just about anything together with proper surface preparations. If you have questions about what will work and what won’t work then contact us via e-mail. We almost always respond with 24 hours.