
Rotten‘Zine
Rotten‘Zine a division of The Rot Doctor, Inc. All rights reserved.
Table of Contents
NOTE: Click any photo to see larger version.
We Plug a Hole on DELTA
By Dr. Rot
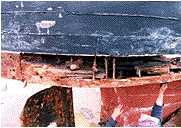
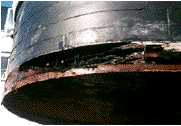
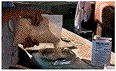
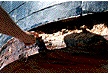
Lest anyone think we are jamming epoxy into rotten holes for the sole purpose of promoting our products, I ask you to take a look at the picture to the right showing the big hole in DELTA’s radius transom. Messy looking, isn’t it? The top picture is the raw hole; the wood in the second picture is shiny because it’s been saturated in Clear Penetrating Epoxy Sealer™ (CPES™)* and then over-coated with one application of Layup & Laminating Epoxy Resin*. We’ll get back to that in a minute. When we first ripped off the overlying wood it looked plenty ugly. Did we know it was there? Not really, but considering the condition of the old rub rail we tore away, we were not a bit surprised.
You can see that the hole is about 5 inches deep in some places and it’s still not through the hull. Why? Because the radius stern of this old boat is built out of a series of cross-laid and over-laid beams (stacked like bricks) about 8″ square that have simply been ground off on the stern to give the radius. Strong as hell but too complicated to just go in and replace that one beam - fastenings removed, bottom planks torn loose, and God knows what else once you get into it. A nice little project for a shipwright, an open wallet situation for the owner. No thanks, not for us.
An alternative, I suppose, would be to pull the fastenings, prize loose the 2″ bottom planks, go in there with some grinders and grind away all the bad wood to a flat surface, and then put back in a new piece of wood or laminated wood strips glued and screwed into position. Refasten. Might work, depending on what you hit or tore loose during the grinding process. With a boat built in 1889 every repair is an adventure. What you see in the pictures is probably original: Iron nails to fasten the planks, wood drifts for tying the beams together.
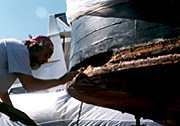
But why bother with wood reconstruction, the time and the expenses? Aesthetics? All right, I’ll concede that. There is nothing beautiful or refined about our solution. But then there’s nothing beautiful or refined about us either (that is me myself there with the ratty beard and the scruffy bandana). For the purity of wood and the spiritual preservation of a classic old boat? Very nice, but my wallet is empty, and I already owe the IRS, the dentist, several medical establishments, VISA, Mastercard… This old girl would have been dead a long time ago if spiritual purity had been the criteria for repair efforts. Naw, she’s like the grizzled old man shuffling along the street with a pacemaker, hearing aids and his blood loaded with beta blockers and Coumadin. Still alive, but not too pure.
It is generally agreed among those who work with wood and epoxy resin that the bond between two pieces of wood well saturated with the properly formulated resin or glue is exceedingly strong. Sheer tests by all major epoxy manufacturers/distributors have proven that. We ourselves have demonstrated that the bond between an epoxy filler of Layup & Laminating Epoxy Resin* and wood flour and wood previously saturated with CPES* and L&L Resin* is so strong that the wood will rip before the bond will break. So the solution to our rotten hole is obvious, especially so when you consider that the whole thing would be finally covered with a new rub rail of clear and perfect 6″ X 1/4″ laminated fir strips.
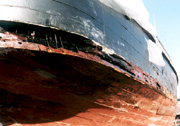
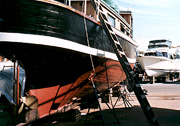
The process is simple. You can see up the starboard side that we had other rot problems further forward once the old rub rail had been torn away. In this case the rot was into and in a few places through a standard 2″ X 8″ fir plank. And farther forward than any of these pictures show, it was so bad we just ripped it all away and replaced the plank. What does a 2″ X 8″ X 28′ clear fir plank cost in Seattle? Two hundred and sixty dollars, my friends, delivered to the boat. From Eden Saw, over on the Olympic Peninsula, and a very nice piece of wood it was.
Anyway, back to the rot. We pulled all the loose bad wood out with fingers and screwdrivers and chisels until we hit the boundary area between rotted and good wood. Where fastenings were exposed we used a Dremel tool to grind away all rust and debris. In a few areas where the wood was more than just damp, we applied the heat from a 80,000 btu commercial kerosene forced air dryer to the wood for a few hours to get rid of the water. In Seattle, you’re almost always fighting rain; we had plastic drop cloths that came down each night for protection. And then all the rotted areas were saturated with a coating of Clear Penetrating Epoxy Sealer*. It was injected by syringe and splashed on by brush, as much as the wood would take over about a 1/2 hour period. This was left overnight to cure and then the process was repeated. We gave the CPES* two more days to cure out and then applied the layer of Layup & Laminating Epoxy Resin*. This final layer of resin bonds to the CPES* and fills in the little cracks and crannies.
How much CPES* did she take? In the rotted areas around the stern, about a gallon was absorbed. On the frames forward where we replaced the plank, another gallon. Elsewhere in restore/repaint areas, about two more gallons. So about four gallons altogether, retail price $268.36. Cheap protection, I call it.


NOTE: Click any photo to see larger version of each.
We gave the L&L Resin* application two days to cure. Then it was time for the “mud”, the mixture of resin and wood flour. The Layup & Laminating Epoxy Resin* is a slow setting resin, the pot life being about 1 hour at 72°F. Takes us about 10 minutes to get the wood flour mixed in thoroughly, so there’s plenty of time left for application. They key here is to get just enough wood flour in so the mixture will barely “hang”; you want the maximum amount of epoxy resin surface for good bonding. We in fact make it loose enough that we always have “hang” sag and have to go back in finally and fill the gaps.


In an area this large, the resin/flour mixture must be applied in several stages. For the first application we concentrate on pushing the mixture into all the back spaces and holes. We use putty knives, screwdrivers and wood sticks - whatever will get it in there. Let it cure overnight. Go back the next day and just bulk it in - big quantities. The third application is a fill and smooth. And finally we use the white Fill-It Epoxy Filler* to take care of the gaps. Further forward, smaller cracks and gaps are usually a one swipe application. If there’s a hole through the plank, we make a backer plate out of cardboard and a piece of wire, insert it, and then pull the wire taught while the putty is applied. Once hardened, clip off the wire. Cost? About $8.00 worth of wood flour and $150.00 for the Layup & Laminating Epoxy Resin.
After a couple of days the whole thing is ground smooth with #60 grit belts on a belt sander. The wood flour/resin mix is a bitch to sand and on large areas the belt sander or large disc is the only way.
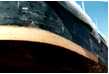
In our case, the hard work was done. You can see in the picture the first of eight 1/4″ planks that were wrapped around to form the stern rail. These were first nail-gunned into position and then lag-bolted through when the whole 2″ thickness was up. And yes, we lagged right into the repaired area. No problems.
Just so you know, the new hull plank was coated with the CPES* before being wrestled and lagged into final position. The covering rub rail likewise. Took about 2 quarts. That’s about $39.00.
The new stern portion of the rub rail was laminated with the Tropical Hardwood Epoxy Adhesive*, and then coated finally with the CPES*. About 4 quarts of the laminating resin* and another quart of the CPES*. So that’s $150.00 for the adhesive and about $19.00 for the CPES*. I’ll let you add all this up if you want to. For us, the comforting thing is knowing that we were using products that are the best of their kind. That patch and the new rub rail will still be there when the rest of the boat (and me) are gone.
* These products are unavailable, we are selling comparable products that will perform these same tasks. Feel free to contact us if you need assistance with which products to use.