
Rotten‘Zine
Rotten‘Zine a division of The Rot Doctor, Inc. All rights reserved.
Table of Contents
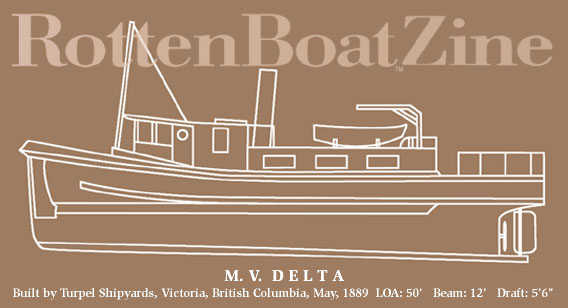
DELTA’S HORN TIMBER: Fixing It On The Cheap
By Dr. Rot
When we first saw DELTA she looked forlorn. Late winter, gusty wind, overcast, intermittent rain, typical Pacific Northwest.
DELTA was tied to a thin dock at a tugboat company at the confluence of the Pitt and Fraser rivers in British Columbia, a few miles East of Vancouver. Her paint was worn and varnished, cabin sides spotty and stained. River water, brown and silty from upstream glacial grinding, moved past at about a knot.
I spent a day going over the boat. Her hull had been built in 1889 and deck and cabins rebuilt after a fire in 1982. She had not been paid much attention since the 1980’s. My expectations were not high.
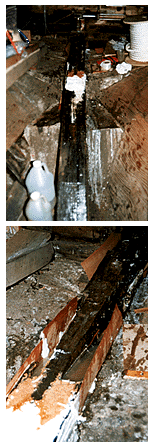
All in all I was pleasantly surprised. Some bad fastenings, some rot in the bull rail aft, some soft wood on deck - and a massive horn timber in the lazarette with two thirds of its surface so soft, punky and deteriorated that looked as if it could be pulled apart by hand. The rot was worst higher up and aft and the cause was evident: A leaky flush steel deck access plate that dripped water directly onto the horn timber.
When buying an old wood boat, price is everything, since you know that you’re going to have to put an unknown amount of dollars and many, many hours of labor into her. Why we should being doing this at all is the cause of stale dockside jokes and probably a good subject for a long article or short book for anyone into mystical experiences.
In any event, we bought DELTA after a survey (always a good idea but required by the bank in our case. Are you a little surprised that a bank would finance a boat built in 1889? I was.) The survey turned up all the usual stuff associated with an old wood boat, but the main focus was the horn timber. Here’s your money, said the bank, but you’ve got to fix that horn timber. Right, said the insurance company, fix the horn timber, but they insured DELTA anyway. I considered the attitude of both the bank (KEY BANK) and the insurance company (MARINER’S GENERAL) benign and enlightened.

DELTA’s horn timber is massive, about 8″ wide and 18″ deep, rising in a gentle 6′ arc from the keel timber forward to her rudder post aft. It’s actually two hunks of wood, one on top of the other and then through bolted. And encased in concrete on both sides for much of its length.
Ah, that concrete! It had been neatly poured into stepped frames as a counter-balance to the weight forward, principally the engine under the wheelhouse. There was probably 800 pounds of it back there. It did tend to complicate the job. To get at the horn timber the concrete would have to be jack-hammered out. No fun…jackhammering concrete in an enclosed lazarette.
And what would all that hammering do to the frames and the fastenings and the planks? Nothing good. It was clear to me that what might begin as a project to replace a horn timber could end up as a total rebuild of DELTA’s stern. A British Columbia yard estimated $15,000 for the job (horn timber only); a Seattle estimator just shook his head and shrugged. How about $20,000 to start, maybe more? It was an open invitation to hemorrhage cash. I had been through similar situations before with other old wood boats and I knew that once you opened them up and started working there was no end of things that needed doing until most of the hull had been rebuilt. I didn’t have anywhere near that kind of money.
Have I mentioned that Seattle winters are wet and the days are short? From November through March there is very little opportunity to do any work on the exterior of a boat. Those of you in the northern states or Europe know this: The boat is out of the water, usually, and while it’s possible to pick at the outside of the hull, most of the time is spent huddled inside the cabin with a heater working on those odd projects you don’t want to be doing in the spring because the outside of the boat has insistent demands that must be met if she is to go in the water in time to get in any boating at all before the cold weather closes in and she has to be hauled again.
Pretty much the same here, except our boating season is longer and we don’t have to haul because there’s no ice. So it was that I found myself crouched in DELTA’s lazarette contemplating the rotten horn timber. The steel access plate had been quickly replaced with a broad-lipped opening hatch that when cracked open allowed ventilation to the lazarette, even in the rain. No more leak and fresh air, even in bad weather. Still, there was the rot.
I began picking at it, like a scab. Chunks of it pulled away. Then more fine stuff, more chunks, rotten splinters, a couple of buckets full. But there was good news: a central strip of the timber, about 3–4″ wide where the through bolts were, was still solid, clean oak. I hammered, chiseled and shop-vac’ed my way about 4 feet down the timber and 6–8″ inches deep on both sides of the good wood in the center. The knobs, protuberances and overhangs of good wood were left in place if it was not necessary to chisel them away to get at rot underneath. Nothing was removed that wasn’t necessary.
So far the rot seemed limited to the to top 6–8 inches of the top timber and for about 4 feet down the timber from the rudder post. To check this, I used a long shank 5/16″ drill bit and drilled down vertically another 6–8″ at intervals to see if there was more rot. For those inclined to ponder human psychology, these are always interesting experiences. One wants desperately for things to turn out well, for there to be no more rot, because the implications of finding more and deeper rot are depressing to the extreme. Kind of like being your own surgeon. How deep should I drill and how close the holes? I think I struck a good compromise and the news was all good until nearer the base of the timber the drill bore through a layer of good wood and then just plunged another 5″ into a black mush. I chiseled through and scooped and scraped out this mess until I was again at solid wood. More drilling brought up nothing but good, clean oak. I tried additional holes in from the side without hitting any more rot.
I now let the whole area dry for several weeks. It was summer in Seattle by this time and the lazarette hatch could be left open wide. I removed the aft cabin door leading to the lazarette for clear air flow through the area. My next step was to spend about six hours back there (an hour or so at a time) with a hair dryer going full blast into the excavated areas. The wood at the interface of bad-good turned brittle and gray for 1/8 to 1/4″ deep, depending on how much access I had to any particular spot.
Now it was polymer magic time. I assembled syringes, needles, chip brushes, a respirator and a 2-gallon (7.6 L) unit of Clear Penetrating Epoxy Sealer™* and went to work. Starting at the base of the timber, I injected, painted and poured in the epoxy. The stuff is about the consistency of diesel fuel and the wood just soaked it up. I applied it until it was running out the base (primarily through the interface of the two timbers), and then just kept moving up and up. Altogether I used about a gallon and a half, much if it leaking out from the base and sides. I placed a box fan in the cabin lazarette access hatch to blow the solvent fumes back and out. Even so, the smell was powerful and my wife and the cat kept well clear. After a week I repeated this process just to be sure; this time the wood took only about a quart (.95 L) before dribbling out.
It takes at least 72 hours for the solvents to evaporate away and leave the epoxy resin in place. Because there was so much and so deep into the timber - and because I was in no particular hurry - things were left to ventilate for several weeks. The Clear Penetrating Epoxy Sealer™* leaves the wood dark and firm to the touch, resilient but not hard.
Next I repeated the whole process using the Layup and Laminating Epoxy Resin™*. There are no volatile solvents in this so it was a fairly benign process from a health point of view. It took about a gallon (3.78 L) of resin to fill voids, crevices and the like before it too began running out onto the concrete floors. That cured, I repeated the process until I was satisfied that all the little niches, cracks and voids were full of epoxy resin. I next built a base dam out of Fill-It™ Epoxy Filler* to contain the aft-to-fore flow and bulkheads out of thin wood to contain the flow out the sides, and then just started building back up with epoxy resin and heavy glass tape. Layer and pour until the top of the dam was reached, let it cure, build another dam, layer and pour, and so on. Every weekend pouring, layering and dam building. Eventually the whole timber was built back up, solid epoxy and tape now where the rot had been. I then ground the whole thing smooth with a sander and painted it white. Feels solid, looks good.
But how good? Here we get into a nebulous, and I suppose somewhat controversial area of wood rot, the migration of water in wood, and the effects of various treatments and structural solutions. I think the main bone of contention here is whether the Clear Penetrating Epoxy Sealer™* in fact “cures” the remaining rot at the bad wood-good wood interface and whether one can in fact get to all the rot by the methods I used on DELTA’s horn timber.
I don’t know the answer to either of these questions. It’s like a surgeon going after a carcinoma: He enters, he looks, he makes a decision regarding the extent of damage, he excises as best he can, he closes and hopes for the best. Same here. I do know this: Clear Penetrating Epoxy Sealer™* is the best treatment we now have for wood rot in boats (or wood rot anywhere, for that matter). Nothing else on the market is thin enough to penetrate so deeply into the affected area and into the fibers of the wood. Nothing else is based on wood derived resins that remain tough and flexible when cured. Followed up with standard epoxy resin (a step I believe is absolutely necessary), the repaired area is at least as strong as the wood it replaced. There is no argument that the best and preferred solution to this or any rot problem if to replace the wood with new wood. But at what cost?
Any shipwright would argue, and correctly so, that in DELTA’s case all I did was attempt to correct one isolated problem. What about the frames that tie into the horn timber? What condition are they in? What about those through bolts and other fastening? Epoxy doesn’t restore deteriorated fastenings. Yes and yes and yes, I agree. And at some time down the road those questions will be addressed. At some point planks will be pulled from DELTA’s bottom aft (and I can tell you there are several that could stand investigation) and we’ll see what we shall see. I anticipate some interesting choices to be made then, as well. I can envision myself arguing, ‘Well, that concrete looks pretty solid to me. Let’s stop thinking about removing it to get at bad wood and treat it as a structural part of the boat (there are already iron bars tying the concrete to the horn timber, I discovered) and think about fastening new frames and planks directly to the concrete.’ Heresy maybe if you’re a purist; maybe a good idea if you’re a poor owner.
Meanwhile, nothing moves back in DELTA’s lazarette. Under power when the stern squats and the prop thumps away, no water comes in and no bits and pieces are falling off. Looks good to me… at least for now.
* These products are unavailable, we are selling comparable products that will perform these same tasks. Feel free to contact us if you need assistance with which products to use.